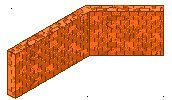
Perspectives walls can be used to form the edges of floors, or be used to make balconies. The appearance (color and hatch pattern) of walls is controlled by the current Perspectives Settings. Not all the walls surrounding the room need be displayed.
· Add a wall of a predetermined thickness ![]()
· Add a wall in the current thickness ![]()
· Add a wall with a user-defined thickness![]()
· Control the appearance (color and hatch pattern) of a wall with Perspectives Settings![]()
· Creating a cutaway wall section. ![]()
To add a wall in the current thickness
1 On the Perspectives toolbar click Wall, current thickness ![]() .
.
The prompt reads "First node:"
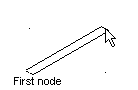
2 Click a point for the first end of your wall.
The prompt reads "Next node or enter distance [done]:"
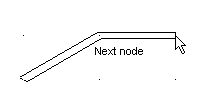
3 Either click the next point on the wall, or point the mouse in the direction you want the wall to go and type a distance then press RETURN.
4 Repeat step 3, right click to finish the wall base.
The prompt reads "Height[n]:"
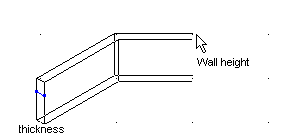
5 Either click a point on the top of the wall, or type a height then press ENTER or right click to accept the default (previous) value.
1 On the Perspectives toolbar right click Wall, current thickness ![]() .
.
2 Click Wall, 1’ thick or Wall 2’ thick, depending on the thickness you require.
The prompt reads "First node:"
3 Click a point for the first end of your wall.
The prompt reads "Next node or enter distance [done]:"
4 Either click the next point on the wall, or point the mouse in the direction you want the wall to go and type a distance then press RETURN.
5 Repeat step 3, right click to finish the wall base.
The prompt reads "Height[n]:"
6 Either click a point on the top of the wall, or type a height then press ENTER or right click to accept the default (previous) value.
To add a wall with a thickness of your choice
1 On the Perspectives toolbar right click Wall, current thickness ![]() .
.
2 Click Wall, choose thickness. Type a thickness and press ENTER or click two points the required distance apart.
The prompt reads "First node:"
3 Click a point for the first end of your wall.
The prompt reads "Next node or enter distance [done]:"
4 Either click the next point on the wall, or point the mouse in the direction you want the wall to go and type a distance then press RETURN.
5 Repeat step 3, right click to finish the wall base.
The prompt reads "Height[n]:"
6 Either click a point on the top of the wall, or type a height then press ENTER or right click to accept the default (previous) value.
Only the Floor hatch pattern does not affect the appearance of the wall – all others do. See Perspectives Settings to select predefined settings or create your own.
To reveal hidden areas of the your drawing which would otherwise be hidden, you can create a cutaway wall section.
1 Add three wall sections, the two outer sections the correct height, the mid section 5’ lower.
2 Click ![]() to open the Wall Features catalog.
to open the Wall Features catalog.
3 Click the cutway symbol appropriate for the wall section you are creating then add it.
4 Add the second cutaway symbol.