Effects Listing
The following effects are currently available from the Sheets and Effects dialog.
Adjust Hue/Saturation
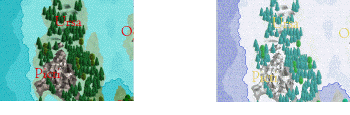
Adjusts the values of every pixel. Usually used on an entire drawing.
Parameters
Hue: the angle of the color and the color wheel (imagine the rainbow represented in a circle)
Saturation: the intensity of a specific hue. A highly saturated hue has a vivid, color, while a less saturated hue appears more grey.
Lightness: the perceived amount of light in color. A high value tends towards white, and a low one towards black.
Uses Adjusting the color, birightness and contrast of the affected area using the HSL model.
Bevel
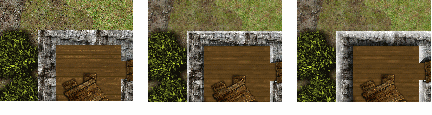
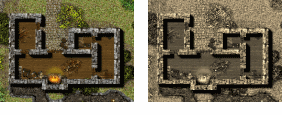
Bevel gives and illusion of depth to edges. It adds a dark area to edges facing the lower left corner of the screen and a light area to edges facing the top left corner of the screen. The edge of the bevel can be faded to appear curved, and the color of the bevel inverted to invert the 3D effect.
Parameters
Length: the length of the bevel in current drawing units.
Strength: Increase this to decrease the transparency of the bevel.
Invert Colors: Set to 1 to make the area appear sunken instead of raised. This only works if there are other visual queues such as a drop shadow to show where the light is coming from, otherwise it just appears that the light is coming from the opposite direction.
Fade: Values of 1-5 cause stronger fading of the bevel towards the inside of the edge.
Uses
Although the tops of walls are not usually beveled, a bevel shows that the wall is 3D, and can look very nice. Cylindrical objects also benefit from long, fading bevels.
Blur
Blurring soften and remove noise, as well as smoothing out hard edges between filed areas. Blur is the slowest effect.
Parameters
Blur radius: The distance around each blurred pixel which is taken into account. The larger this is, the slower the blur effect.
Uses
Frequently used for backgrounds, water and contours to blend areas of color and fill styles. When blur is used on the entire drawing, it can soften it.
Displace
Distorts pixels based on another sample image.
Parameter
Image is a bump map: will indicate that the image is a bump map (like ball.png). If unchecked, this item indicates that the item is a normal map (test.png looks vaguely like a normal map).
Displacement Amount: the size to scale the vector by. A displacement of 1 moves things 1 pixel, 2 moves them 2 pixels, etc.
Texture size: the size of a tile in world units if the Unit check box is checked.
Technical Data
The displace filter works by using a displacement map to compute the new pixel to use at the current location. The displacement map is implemented as the red and green channels of the . The normal map is an image that encodes a vector’s X, Y, and Z components into the R, G, and B components of a pixel. The Normal Map shader in FT generates examples of a normal map. For every XY pixel in the output image, the appropriate normal map XY components are added to the current XY position and that pixel in the input image is used as the output pixel.
A bump map is a grayscale image that represents height data. These heights are used to compute a normal map which is used as described above. If you don’t have a handy normal map, using a grayscale image as a bump map will often work well.
The "best" files to use are normal maps because you have complete control over the displacement. However, bump maps are much easier to generate. For example, you can use a logo, text, or any shape that you want as a displacement map. Just turn that map into a slightly blurred grayscale (or even slightly blurred color image; the filter will convert to grayscale before using the image) and specify it as a bump map. The ball.png file is an example of a bump map. The image converts to a vector field pointing directly away from the center point. Pixels are pulled from outside the image area into the gray area. Using a semi-random field will generate semi-random displacements. This effect could be used with a rough paper bitmap to apply a set of displacement patterns to the image. Combine this with texturize using the same or a slightly different paper image for an interesting effect.
Uses
This effect can be used to age or erode the edge of walls or contours.
Drop Shadow
Drop Shadow gives the impression that entities are floating over the background by adding a shadow.
Parameters
Offset X: The horizontal displacement in units. Enter a negative value for the shadow to be displaced to the right of the entities.
Offset Y: The vertical displacement in units. Enter a negative value for the shadow to be displaced below the entities.
Opacity: 0% is totally transparent (no effect)
Blur: softens the edge of the shadow
Uses
Primarily used with text and to make them stand off the background.
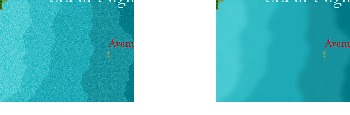
Edge Fade
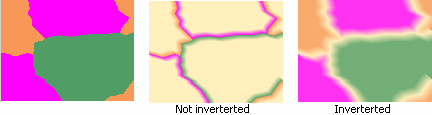
Edge fade finds solid-filled areas on the current sheet and fades them to or from the edge. It has no effect on entities with non-solid fill styles.
Distance: The width of the fading area.
Invert Colors: If 0. it fades towards the interior, if 1 it fades towards the edge.
Opacity: The opacity of the non-faded area
Uses
This effect is ideal for political borders in a map made up of solid-filled regions.
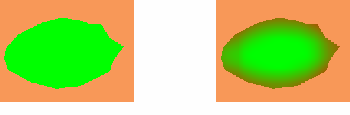
Glow
Adds a color halo around the affected sheet. The glow will make a copy of the entity in the selected color. This is then blurred.
Mode: Choose Inside for the glow to be in the interior of the shape, Outside to be outside the shape.
Color: Click the colored area to choose a color from the palette, or type an RGB value.
Strength: The density of the glow. 0 gives a minor effect.
Blur Radius: The width of the glow.
Uses
Uses to offset text or symbols from the background, or do an outline outside a wall or landmass.
Inner Glow
A glow inside an entity which is less graduated than Glow.
Parameters
Blur: Blur width.
Red, Green, Blue: 0-255 color values.
Opacity: 0-100%, with 100% solid.
Brightness: Lightens the glow.
RGB Matrix Process
Adjusts the color of the pixels in the affected region. It gives you a linear combination of the input RGB color components. This technique lets you perform color conversions such as sepia tone, grayscale, pure red, pure blue, pure green, and so on. There are many possible combinations of operations, but the important idea is that it's one pixel in, one pixel out. You can also use this filter to darken or lighten an image.
Parameters
Predefined: The drop list on the bottom of the RGB Matrix Data Entry has a number of presets, including sepia. Load: Loads a saved setting.
Save: Saves the current setting.
Uses
The predefined values are commonly used to make the whole drawing greyscale, or sepia, and some saved values let you darken and lighten areas.
Technical info
For each output RGB pixel in the image you can generate a linear combination of the input RGB pixel channels as shown below:
Rout = (R1 * Rin) + (G1 * Gin) + (B1 * Bin) + C1 Gout = (R2 * Rin) + (G2 * Gin) + (B2 * Bin) + C2 Bout = (R3 * Rin) + (G3 * Gin) + (B3 * Bin) + C3
the coefficients (R1, G1, B1, C1, etc.) allow you to create a linear combination of the input RGB value (*in) as the output (*out) and are the values that you enter via the dialog. These coefficients form a 4x3 matrix, thus the name of the operation. The default (no effect or unity) transform is set when the appropriate component is 1 and the others are 0 as shown below:
Rout = (1 * Rin) + (0 * Gin) + (0 * Bin) + 0 Gout = (0 * Rin) + (1 * Gin) + (0 * Bin) + 0 Bout = (0 * Rin) + (0 * Gin) + (1 * Bin) + 0
or
[1.000 0.000 0.000 0.000]
[0.000 1.000 0.000 0.000]
[0.000 0.000 1.000 0.000] n
as a shorthand notation.
A constant white RGB value can be created by ignoring the input values as shown below:
[0.000 0.000 0.000 1.000]
[0.000 0.000 0.000 1.000]
[0.000 0.000 0.000 1.000]
There are many effects that can be generated with this technique. For example, a simple darkening effect might be
[0.800 0.000 0.000 0.000]
[0.000 0.800 0.000 0.000]
[0.000 0.000 0.800 0.000]
and a contrast reduction/lightening effect might be
[0.800 0.000 0.000 0.200]
[0.000 0.800 0.000 0.200]
[0.000 0.000 0.800 0.200]
In general, the values across a row column should sum to 1. Special effects such as darkening or lightening are the only times you would want to break this rule.
Screen Border
CC3 can't calculate certain effects for example, a drop shadow from something off the active window. To make sure maps look fine in your drawing window and prints , you can add an opaque border to the active window.
Parameters
Width: The width of the border as a percentage of the screen width.
Outer Opacity: the opacity of the outside of the screen border.
Inner Opacity: the opacity of the inside of the screen border.
Inner color: the color of the inside of the border.
Outer color: the color of the outside of the border.
Load and Save: You can save the current screen border and add existing ones.
Uses
If you are printing a particular view of a map, and you can see an edge effect you don't like, use an opaque white solid sufficiently big to cover the problem up. You can also use it to give a fake 3D button to the edge of your screen by having the border opaque at the outside fading to transparent on the inner edge.
Spatial Matrix Process (SMP)
This allows you to define a multitude of different effects; blurs, displacements, edge effects, embossing and brightness/darkness. It works in the same fashion as Paint Shop Pro's User Defined Filters. There are a number of saved settings, and it is likely you will want to use these. SMP works on a pixel basis, so its effects will vary with zoom levels. Most users will be content with preset values, or slight modifications of them.
Parameters
Load and Save: Let you load saved settings, and save the current setting.
Filter matrix values: These represent the effect surrounding pixels have on the current pixel. They can be any integer value.
Division factor: each value in the filter matrix is divided by the division factor before being applied to a pixel.
Calc divisor: Unless you want an effect which darkens or lightens the image, you should click Calc divisor.
Bias: Shifts the value of each pixel (use in emboss effects)
Techical Information
This effect changes each pixel's color based on its current color and the colors of surrounding pixels. The effect each surrounding pixel has is defined in the filter matrix.
Each pixel's color value is multiplied by the coefficient in the matrix center, and any pixels within the matrix are multiplied by the corresponding coefficients. The sum of the products becomes the target pixel's new value.
For a good tutorial on how to create user defined filters in Paint Shop Pro which applies equally well to CC3, try Lori's Web Graphics.
Uses
A wide variety of uses, usually as a whole drawing filter.
Texture Overblend
Texture overblend replaces filled areas with a selected tileable texture, and fades that texture towards its edge.
Parameters
File: Select any tileable png or bitmap file, for example from your bitmaps\tiles folder.
Scale: Scale each tile to be this size in either units or pixels.
Blur: Adds a blur to the edge of the area.
Unit: Sets the scale to be in drawing units rather than pixels.
Uses Background areas filled with different fill styles, for example grass contours. Each type of grass contour would be on a different sheet, with the Texture Overblend file pointing at the correct bitmap tile.
Texturize
Adds a semi-transparent pseudo-3D texture to the affected area.
Parameters
File: Select a tileable texture.
Intensity: The strength of the effect.
Azimuth: The angle from above at which the texture is lit.
Angle: the angle around screen from which the texture is lit.
Scale: Each tile is this size in units.
Uses
Adding a paper weave to a whole map, adding textures to sold filled areas for interest. If you have Paint Shop Pro on your system, you will find many suitable texture files there, and online.
Transparency
Change the opacity of the selected area.
Parameters
Opacity: 0 – fully transparent; 100 – full opaque.
Uses
Add to a grid overlay to allow you to see what is underneath. Add to shallow water sheets to show what is underneat, make ghosts and oozes or show what is underneath a forest.
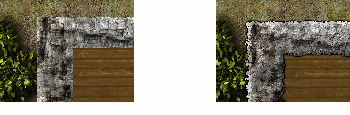
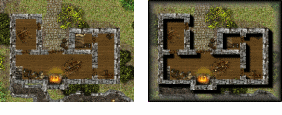
Wall Shadow
Adds a shadow to all appropriate edges which looks as if it has been cast from a vertical surface.
Parameters
Length: The length of the shdow
Opacity: from 0% (transparent) to 100% (solid)
Blur Radius: the length of a blur a the edge of the shadow (0 for a sharp edges shadow)
Uses
This is specifically desgined for use with walls, although it works pretty well on symbols sheets, too. DD3 maps have different sheets for symbols specifically so you can add different length wall shadows to different types of symbols.
Related Topics
Effects Listing
Sheets and Effects
Using Effects