LINK WITH ENCOUNTER links an area on your map to a Core Rules 2.0Ò encounter. You can link to an existing encounter or create one there and then.
To link with an encounter:
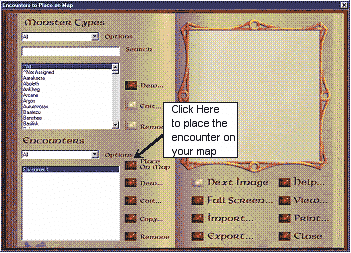
You can see the Core Rules Encounter dialog box:

This screen allows you to create encounters and add them to maps. For help, click on the help button on the dialog box in Core Rules 2.0. Some details are included here.
The Options drop down list box allows you to select which monster types are shown in the scrolling list box below it. The monster type categories are Standard (monsters which shipped with the program), Custom (monsters which have been added to the program database), and All (Standard and Custom monsters).
The Search box: Between the Options drop down list box and its associated scrolling list box is the search box. The Search box allows you to quickly locate a monster by typing its name in the box.
If a match is found, the program will automatically select that monster in the scrolling list box. Otherwise, it will select the monster whose name is closest to the one entered.
Encounters: The lower left of the screen manages the Encounters for the various monster types. The Options drop down list box provides the same filters for Encounters as the similar box at the top of the screen provides for Monster Types: All, Standard, and Custom.
New…: This button allows you to create a new encounter for the selected monster in the upper (Monster Types) scrolling list box.
Edit…: This button allows you to access and change the information for the selected encounter in the Encounters scrolling list box.
View: This allows you to see a print preview of the printout for the currently selected encounter.
Select an existing encounter or create a new one then select the "Place on Map" button.
The prompt reads "Hotspot Window". Select a corner for the hotspot.
The prompt reads "Opposite Corner". Select the opposite corner of the hotspot.
Related Topics: