When you’ve chosen your symbol, catalog you are ready to insert symbols. Click a symbol. Click on the screen to insert the symbol reference at its insertion point. Continue inserting symbols until you click the right mouse button.
![]() Note the prompt while positioning the symbol. You can stretch or shrink the text by pressing the CTRL key and moving the mouse slowly up or down. You can rotate the symbol by pressing the CTRL+SHIFT keys together and slowly moving the mouse.
Note the prompt while positioning the symbol. You can stretch or shrink the text by pressing the CTRL key and moving the mouse slowly up or down. You can rotate the symbol by pressing the CTRL+SHIFT keys together and slowly moving the mouse.
The right click displays the Symbol Parameters dialog box.
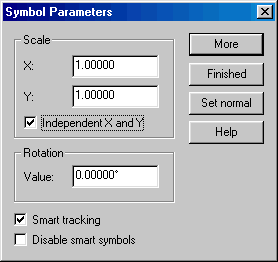
Scale
Type in a value to shrink or enlarge the symbol. X scales horizontally, and Y scales vertically. If you want to keep both values identical, don’t check Independent X and Y. If it is checked, it will change the symbol’s aspect ratio. When you open a drawing, the scale will be set to the drawing's default scale, if there is one. This is set on the Drawing Properties dialog.
Rotation
Type in a degree value to rotate the symbol upon placement.
More button
Click to return to the symbol insertion mode. The symbols you draw will possess the scaling and rotation characteristics of the dialog box.
Finished button
Click to end the Draw Symbol command and return to the normal drawing screen.
Set Normal button
Click to automatically reset values to their defaults: X Scale = 1.0, Y Scale = 1.0, XY Rotation = 0.0°.
Smart Tracking
Check on to enable dynamic cursors with Smart Symbol awareness. The symbol cursor will align/cut/scale according to its defined control points. If this option is off, the control points will still take affect unless the Disable SmartSym option is off. If Disable SmartSym is on, then Smart Tracking will be disabled regardless.
Disable SmartSym
Check on to disable control points functionality. When on, symbols will not align/cut/scale upon insertion, and Smart Tracking is disabled.
Related topics
![]() Go to the Symbols overview
Go to the Symbols overview
DEFINE SYMBOL command
LIST SYMBOL command
DELETE SYMBOL command