ralf | May 24, 2018 | guest article, overland maps, Par lindstrom
 This is the second part of my series about making an overland map in Campaign Cartographer, you can find the first part here.
Next step is to start drawing the land. At the moment we only have a water background and a SHEET with the sketch map. Select default landmass by clicking on the icon in the top left corner of the program. Fill in the land as it is in the sketch map, once you are done you will see the land texture as its SHEET is on top of the sketch. Now is also the time to fill in all the islands if you have any. Also remember that the sketch map is a sketch, if you feel like you want to change anything just do that, I for example added in some more small islands that I thought made the map look better.
 When you are done you wont see the sketch map so you have to hide the SHEET with the land texture. To do this click on the SHEET and EFFECTS icon and mark the Land SHEET with an H in its right box, as in the picture. You will now be able to see the sketch map again.
When I start adding symbols to a map I always start in the upper left corner and work my way down while going from left to right. In this way I will always get the symbols in the right order, which will make it much quicker to finish the map. In this first step I’m only adding all the big strokes that means mountains, forests and rivers, just so that I’ll get a grip of the map. I also try to not make the terrain too square because that will make the map look stiff and boring. You want to have a map that feels organic, it will make it look much more alive. This is especially true when it comes to the rivers. Straight rivers don’t look god, try to make them curved so you will get a sense of that they are flowing. Also remember that rivers always branch out upwards. That means that you will have many starting points but only one end point. The only exception to this is if you have a river delta at the end where the river will meet the ocean.
 At this point the map looks rather empty so it is time to add in some more details. A good thing to do is also to hide the sketch maps SHEET so you can see all textures for your map. When I say details I mainly mean to add in some extra trees where the forest ends, adding some hills at the mountains edge and creating some deltas at the rivers. Don’t do too much at this stage since we will add in more details in the next step when it is time to actually start shaping our kingdoms. In my map I also added a volcano and some mountains on the right side map, mainly to get a better balance in the map. At this stage the main goal is to have a good base map that you can continue working on in the next step, that is when we will turn the map into a finished product.

Comments Off on Creating an Overland Map by Pär Lindström, Part 2
ralf | April 20, 2018 | overland maps, Par lindstrom, Tutorial
 Pär Lindström is a Swedish fantasy cartographer and map-maker and long time contributor to the Cartographer’s Annual. His maps appear in a wide-variety of Swedish and international role-playing publications. Here is his take on creating an overland map in CC3+.
I’ve used Campaign cartographer for a long time and have made more maps then I can remember, both for personal use and for commissions. This will be part one in a series where I will describe the process I use while making maps.
First of all you have to have an idea of what you are going to map. I usually find inspiration in many different places, it might be that I’m playing an RPG with my family and we need a map for the next session or it might just be an idea that I want to put on paper, or in this case digital paper.
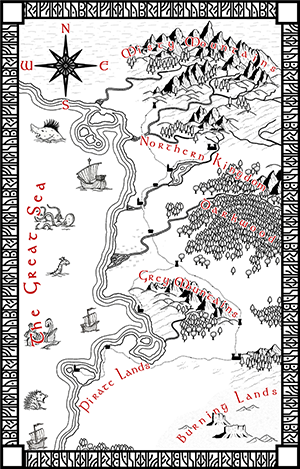
 For this tutorial I’m going to make a map of an area that I’m calling the Three River Kingdoms. It’s an idea I’ve had for a while of an area where you have some kingdoms all separated by three large rivers.
The first thing I do before I start to map is to sketch the map on paper. You can do this both with pen and paper or you can do it digitally. The important thing is that you can have the finished sketch in digital form.
So why is this important? Well I find it so much easier to work in Campaign Cartographer 3+ (CC3+) when I already have a clear idea of what I want to complete. Especially since the order you put down symbols in are quite important. Of course you can change the order of the symbols via the commands “Bring to front” or “Send to back”, but putting things in the right order from the beginning makes your work go much smoother.
 I usually start out by looking at some nice coastlines in Google maps, borrowing from mother earth usually gives you a much better looking map in the end. You can of course make up your own coastline if you want to but I prefer borrowing because it gives me a better end result. In this case I’ve used an area in Italy. Don’t be afraid to move things around a bit, I moved the large Island and rotated it a bit for example.
When I have the area I start drawing on top of it, sketching out some key areas like forests, mountains and rivers. Just so you will know where to add in symbols in a later step.
Next I create the file in CC3+. Since I’m making an A4 map and the pixels of an A4 map in 300 dpi is 3508×2480, that is also the size I’m making the map in CC3+. The reason for this is that when I import the sketch I know it will fit perfectly in the map.
When the map is created I’m adding a SHEET that I name SKETCH. This is where I want to place the sketch map I made earlier. Make sure that the SHEET is placed second to the top just below the SHEET BACKGROUND.
 Check that the SKETCH SHEET is selected and Click Draw/Insert file from the menu and add in the file. To do this you need to first left click with the mouse in the top right corner on the map and then move the mouse curser to the bottom left corner and left click. You will now have a SHEET with your sketch map.
Now it is time to start drawing the actual map, which I will cover in my next post.
Pär lindström – CC3 user for ten years and creater of a handfull styles for the annuals. Follow his mapping days at www.instagram.com/imaginarymaps/
Comments Off on Creating an Overland Map by Pär Lindström
ralf | December 1, 2017 | Annual, city, Cthulhu, Par lindstrom
 We close off the 2017 Annual (except perhaps for a little bonus issue) with another style by Pär Lindström. He created this wonderful new city style for the weird and ominous metropolis of Cthulhu City, a setting for Pelgrane Press’ Trail of Cthulhu role-playing game.
Of course we took the opportunity to create a city style for CC3+ from it. Since the style doesn’t use the City Designer way of drawing individual houses and random streets, you can even use it fully without having CD3 available.
The December issue is now available for CC3+ from the registration page for all subscribers. If you haven’t subscribed to the Annual 2017 yet, you can do so here.
Comments Off on Cartographer’s Annual 2017: December issue
ralf | March 1, 2017 | Annual, overland, Par lindstrom, wild west
 Saddle up, pardner, we riding out into the wild, wild west. Venture into the deserts, mesas and plains of the American West with Pär Lindström’s new overland mapping style “Wild West”. Whether you’re running a historical campaign or a fantasy-version of the old west (for example using something like Owl Hoot Trail) this style allows you to create local and regional maps in the appropriate style.
The March issue “Wild West” contains a beautiful new overland drawing style for by Pär Lindström drawing Old West-themed maps. Dozens of symbols, bitmap fills and drawing tools, combined with a 5-page mapping guide, make creating this type of map a quick and easy endeavor.
The issue is now available for CC3+ from the registration page for all subscribers. If you haven’t subscribed to the Annual 2017 yet, you can do so here.
1 Comment
ralf | August 3, 2015 | Annual, overland maps, Par lindstrom
 We have a wonderful new overland style by Pär Lindström for our subscribers in the August issue. The style is supremely suited for local area maps and therefore works nicely to illustrate stories or small-scale rpg adventures.
The August issue is available both for CC3 and CC3+. You can download both setups from your registration page on the Subscriptions tab. If you haven’t subscribed to the Annual 2015 yet, you can do so here.
1 Comment
ralf | April 1, 2015 | black and white, Par lindstrom, town, Village
 The Annual’s April issue is here on time (and totally without a prank), with another beautiful black and white drawing style by Pär Lindström. This time he gives us the tools and artwork to draw town and village maps in a beautiful, but still easy style. As always you can download the “Black and White Towns” style from your registration page.
If you haven’t subscribed to the Annual 2015 yet, you can do so here.
Comments Off on Cartographer’s Annual: April Issue
ralf | June 4, 2014 | Annual, battle map, Par lindstrom
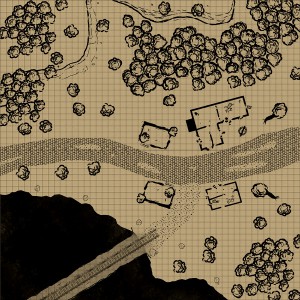 The June Annual has been designed by Pär Lindström – by now one of our most prolific contributors to the Annual. He came up with the idea of this extremely quick to use black and white style, which lets you whip up a battlemap for the next game in no time at all.
Pre-drawn rooms, buildings and mine parts take care of all of the complicated detail work for you. Be it a stretch of forest, an abandoned mine, a farm, or even a town or section of city, all of this can be created with this style in just a few minutes.
As a subscriber you can download the June Annual issue from your registration page. If you haven’t subscribed to the Annual 2014, you can do so here.
2 Comments
ralf | October 1, 2013 | Annual, dungeon, Par lindstrom
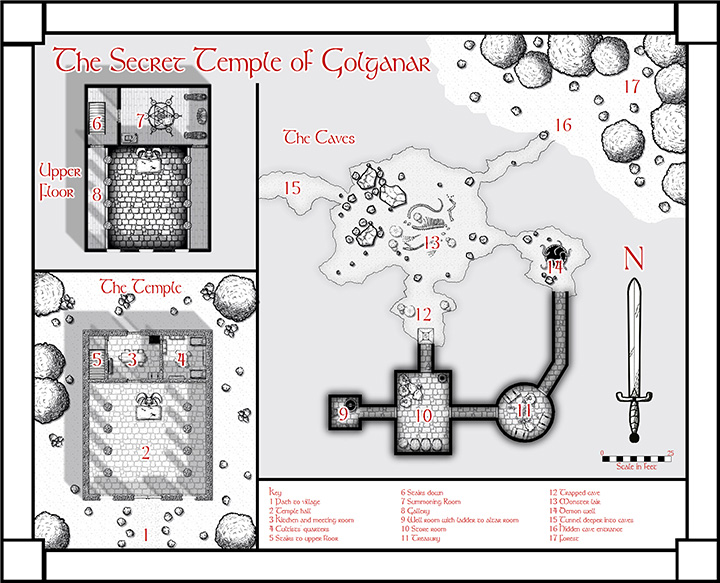
We’ve just released the October issue of the Cartographer’s Annual 2013. Check out another beautiful black and white style by Pär Lindström, this time for floorplans and dungeons. If you haven’t already, you can subscribe to this year’s Annual here. If you have, download the issue from your registration page.
3 Comments
ralf | July 1, 2013 | Annual, Par lindstrom
 The July issue of the Cartographer’s Annual 2013 is now available. Check out Pär Lindström’s beautiful black & white overland style.
Subscribers can download the issue from their registration page. If you haven’t subscribed to the Annual 2013, you can do so here.
8 Comments
Clercon | January 30, 2013 | CD3, Par lindstrom, Village

This is my latest map made in City Designer 3 (CD3), plus some effects added in Photoshop. It depicts the village Farjvad in the province Vadsbro and is part of the campaign/adventure I’m working on at the moment, even though I’ve mostly made maps so far.
Farjvad is situated about a day’s trip north east of the main town in the area, Vadsbro. Farjvad won’t actually be of importance for the adventure I’m writing, but it will still be a part of the campaign information. As you might have noticed I like to make maps, and making the adventure/campaign gives me some good reasons to do that. I also figured out that if I only have maps of the villages where the adventure takes place the players will rather quickly figure out what places are of importance and which ones are not. Also this will make the adventure feel much more unscripted if the players can go wherever they pleasein the area and the GM will have a nice map of the place.
So how did I go from a blank page to a finished map? What shall you think about while making a village map? First of all you have to decide where the village is situated, is it in a forest or a desert? The environment gives as well takes away possibilities for the map. In my case I know from the overland map of the province Vadsbro that Fjardinge is a village that is founded on two sides of a river, only connected via a ferry in the middle of a large forest.
I also decided that the south part of the village was the old one and that the north side is the new part where recent expansion of the village has taken place. Because that the village is situated in the middle of the forest there had to be some place for the villagers to go for protection if some kind of crises turned up. In this case I put a keep (nr 5 on the map) where the governor of the village used to live with his soldiers, maybe ten of them at a max. I could have gone with a palisade but in this case it didn’t feel right.
I also added a temple (nr 4), all places must have somewhere to go for religious need. The ruined temple (7) just outside the village was deserted when the new temple was done. What resides there today is up to the GM to decide.
Nowadays most travelers are using the northern road that leads from Vadsbro to the village Klyvholm. For this reason a newer part of Fjardinge has been built on the northern side. To make the sides differ a bit I decided to make the fields more square here, like they’ve been planned a bit. The big house at the square (nr 1) will also house the governor of the village (he decided to move here from his keep on the south side).
What I’ve actually have done here is making a story around the village and letting the story lead the way while mapping. I think I’ve stated this before but having a story in your head while mapping usually makes your maps more interesting, which means a better end result. It is also a lot more fun to map when you have a picture in your head of what the place looks like, it is like seeing your ideas come to life.
Originally posted on mappingworlds.wordpress.com
Comments Off on Farjvad
 This is the second part of my series about making an overland map in Campaign Cartographer, you can find the first part here.
 When you are done you wont see the sketch map so you have to hide the SHEET with the land texture. To do this click on the SHEET and EFFECTS icon and mark the Land SHEET with an H in its right box, as in the picture. You will now be able to see the sketch map again.
 At this point the map looks rather empty so it is time to add in some more details. A good thing to do is also to hide the sketch maps SHEET so you can see all textures for your map. When I say details I mainly mean to add in some extra trees where the forest ends, adding some hills at the mountains edge and creating some deltas at the rivers. Don’t do too much at this stage since we will add in more details in the next step when it is time to actually start shaping our kingdoms. In my map I also added a volcano and some mountains on the right side map, mainly to get a better balance in the map. At this stage the main goal is to have a good base map that you can continue working on in the next step, that is when we will turn the map into a finished product.


