ralf | July 27, 2020 | Ari Gilder, City Designer 3, city mapping, city planning, guest article
Hello again mappers! Thanks for coming back to my series on infusing your city or town maps with a rich milieu as the backdrop for your stories. If you need to refer back to previous articles in the series, check them out here: part1, part2, part3a, part3b, part4, and part5. Last time we did a thorough deep dive on how to make your districts both unified and unique across the city. This time, we’ll cover a whole bunch of assorted tips & tricks on map-making in City Designer 3.
Tips for Street & Building Placement
Back in Part 4 we covered how to use the Random Street tool in terms of settings for your streets. But beyond just settings, Random Street is going to be the backbone of crafting most large towns or cities, just because it automates a lot for you. But the tool can be a little quirky, so let’s talk about how to get the most out of it:
● If you don’t like the buildings that the tool generated for you, just move the mouse up and down or side to side to regenerate all but the first building (if you want to redo the first building, you need to cancel the tool and try again).
● A key point of the Random Street tool is to quickly make houses that conform to your roads. If you don’t like what you get after placing the buildings, that’s OK! You can move, scale or rotate those buildings (an easy way to do this is Quick Move via Ctrl+Q) or even just erase and hand-draw to fill the gaps. If you have to hand-draw with the House tool for only a few, you’ve still saved a lot of time.
● Don’t worry about overlapping buildings – reuse them instead! While placing buildings, you may find the tool suggesting doing something like the following:

You might be tempted to exit the tool and try again until you get a building shape that fits your constraints. Unfortunately, this wastes time when you are mapping dozens of such streets. A better way is to keep everything the tool generates for you. Then, you can move the trickier buildings around to a spot where they fit, shrink or rotate them, and move/scale/rotate other buildings to fit the newly vacated spot. Remember, vertical houses can become horizontal and vice versa. This way, you now don’t have to draw a house by hand.
● Similarly to the last point – let’s say you wind up with houses that just don’t fit:

That’s OK, don’t delete them! Instead, just Quick Move them aside to an empty area that you’re not working on right now. You’ll start to form a bank of pre-made buildings which you can then use to slot into tricky spots so you don’t have to use the House tool to make a custom fit.
● If you are faced with some empty land and aren’t quite sure where to draw a street, try using the Random Street tool to draw a “road-less street” – click the tool, then click a point that isn’t on a road:

This can help serve as a good visual test for what a road would look like there.
● Speaking of the Road-less drawing mode, it’s also a good way to quickly create a bunch of houses which you can then slot in to place by hand, which is quicker than manual house drawing.
● When placing houses – either via Random Street or the House drawing tool – try to select a neutral color in the Color Picker. There is currently a bug where sometimes the selected color bleeds through the edges of the house. It is possible to change this later with Edit Properties but then you need to be sure it’s the same color as the house’s Roof Ridge – otherwise changing the color will change the Roof Ridge color too.
Tips on Sheets and Shadows
Here are a few assorted tips related to sheets, sheet order and how that affects shadows:
● I find if very useful to have at least 3 different sheets for symbols with different shadow heights – a SYMBOLS LOW, SYMBOLS MEDIUM, and SYMBOLS TALL sheet – in addition to a SYMBOLS FLAT sheet (no shadow). For the ones with shadow, the exact scale of the shadow effect depends on your map, but play around and see what looks good to you.
● Take advantage of your sheet order. You can use the sheet order to hide things – for example, hide some terrain under a river, or a house can be partly hidden under a wall. This can help make things more realistic (there probably are some buildings being overshadowed by the city wall, for example).
● Speaking of hiding things with Sheets – this is one of my favorite tips. Some symbol sets, SS5 in particular, have some terrain included as part of the symbol (e.g. a stone floor). This can lead to disconcerting shadows at first:

We could switch this gate symbol to our SYMBOLS FLAT sheet and get rid of the shadow entirely:

But now that looks a little funny – this gate is supposed to be big and imposing; no shadow just looks funny. Instead, we can create a new sheet, one I called BUILDINGS GATE, and place that under the sheet with this symbol (which I called SYMBOLS GATE). I set up the shadow effect on the BUILDINGS GATE sheet to reflect the height of the shadow I wanted for the gate. On SYMBOLS GATE, I put no shadow at all (so, same as SYMBOLS FLAT).
On the BUILDINGS GATE sheet I drew this little House:

Now I have a nice looking shadow, I can layer the gate (which is flat/has no shadow) to get this final result:

The stone floor still obscures a little bit of the shadow, but now this feels like it has a lot more depth to it regardless.
Technical & Performance Tips
Here are a few assorted technical CC3+ tips and performance speedups:
● When you complete work on a district, create a Layer for it and move all the buildings, symbols and roads in that district to that Layer. Then, you can just hide that Layer entirely when you move on to the next district. This will help with rendering speed a lot, since CC3+ doesn’t have to redraw all those extra symbols. Trust me, you’ll thank me later.
● You can disable Aligned Fill Styles for a slight boost in speed; this can be helpful when working with a large map. You can also change the bitmap quality to Medium (I don’t recommend Low for a city) for a little bit more of a boost. These are available in the Display Speed Settings dialog:

● Don’t be afraid to create your own drawing tools, especially for things like roads which you may need many of, but may also need to vary the size, shape and smoothness. This especially applies for Roads as well as Terrain. Here are some of my drawing tools:

● For some symbols, you may want them to always go to one particular sheet. For example, I want all my docks symbols to go directly to my SYMBOLS DOCKS sheet. To do this, I need to open up the Symbols Manager (Symbols Menu > Symbols Manager or the SYMMGR command) and find the symbol(s) I want:

Then, I click Options and I can check off the Force Sheet option and specify which sheet:

● Remember the keyboard shortcuts! I find the most useful one is Ctrl+Q for Quick Move. By default, Quick Move will only move one entity you click on, put you can press S when you need to select multiple entities.
If you are feeling brave, you can edit your .mnu files to create keyboard shortcuts for other common commands like Erase and Random Street. Make sure to edit the correct .mnu file – for example, SS5 and CD3 have different .mnu files.
Applying Finishing Touches
When you complete a district, or even your entire city map, make sure you take the time to put the text labels you need! You can choose to do this on the map, or on a side legend.
Some things to consider applying text labels for: District names, major landmarks, major streets, parks, squares and other noteworthy features (see Part 5). You can also label more minor locations which may be significant to your characters or players.
When you finish each district, and once again when you finish the whole map, I suggest you do a “consistency check” for your sheets and layers. Hide all except one sheet and check all the entities/symbols on that sheet. Make sure the ones you see are the ones that are supposed to be there (it’s easy for some things to snap to a SYMBOLS DEFAULT sheet, so be meticulous! It will pay off in fewer mistakes when you print or export your map).
Repeat this process for every single sheet and every single layer. This is a last-ditch backstop intended to prevent missing or awkward shadows.
Thank You for Reading!
Well, my fellow mappers, with those final tips, I’ve finally concluded everything I wanted to share with you about City Building. When I started, I wished there was some tutorial that detailed the process of city building, not just a guide on how to use the tools. As anyone who’s mapped a large town or city can tell you, it is indeed a process. Building the map for New Cassia took me about 3 months, with several hours each day (though I didn’t work on it every day, it was just a few hours on the days that I did).
As you build your city, you’ll become very familiar with all its nooks and crannies (it was you that put them there, after all) – turn that familiarity into your city’s history! Takes notes, jot down adventure ideas as you map. I set out to build this city so I could conduct an immersive urban-setting D&D campaign (versus a traditional wilderness or dungeon setting). These can be harder to work with, but if you follow these tips throughout this article series, you are sure you have a great handle on the complexity and intrigue that a large urban setting can offer.
So that’s it, mappers. If you’ve read this far, I’d love to continue the conversation. You can find me over at the CC3+ Facebook Group where I sometimes lurk and try to offer advice when I can. Thank you for reading; I hope I’ve helped you learn a thing or two about how to Bring Your City to Life.
Ari Gilder is a software engineer, and has been interested in maps for a long time. He spent seven years working on Google Maps, working on features like local business search, Google Maps and Navigation on mobile, and studying the way users understand maps. He even proposed to his wife using maps. He often spends hours staring at maps in fantasy novels, and in 2013 starting putting together some of his own dungeon and battle maps for a D&D campaign. After a hiatus of several years, he recently dived back into cartography with CC3+, tackling more overland and city maps in preparation for a new D&D campaign. He is a father of two, and has recently introduced his older daughter to cartography, both hand-drawn and with CC3+ where she insists that black and purple varicolor trees must surround everything.
Comments Off on Bringing your City to Life – Part 6 (by Ari Gilder)
ralf | June 30, 2020 | Ari Gilder, City Designer 3, city mapping, city planning, guest article
Hello again mappers! Welcome back to this series on weaving the cartography and tale of a city or town using CC3+ and City Designer 3. I hope you’ve read the back issues (part1, part2, part3a, part3b, part4). Last time we delved deep into the Random Street tool, an essential part of large city mapping. There’s still more to say about the particulars of that tool – we’ll cover that later.
Today I’d like to continue the discussion from Part 4 about district style. I’ll of course continue using my example map of New Cassia to demonstrate. We talked last time about what makes a district unique from its neighbor, and we explored using building style to differentiate. Today we’ll cover other flourishes that can be sprinkled strategically throughout a map.
One thing to note: for all of these suggestions of unique or common elements, don’t feel limited only to my suggestions here! Find things that are applicable to the particular characteristics of your city.
Common Elements Checklist
Before we cover that which makes districts different, let’s talk about what makes them similar. Take some time and think about what buildings you want to be present in all/most districts. What kinds of things do all walks of life tend to have? Maybe your city has some unique elements based on its government (maybe a major magistrate’s office per district and smaller satellite branches throughout), its geography (perhaps regular watering stations for pack animals in a desert trade city) or its religious history (statues of Orcus throughout a city of necromancers). Think carefully back to your notes about why the city exists and what its primary function is to guide you.
Once you come up with this list (some of this may be trial and error in your first few districts), you’ll actually have a checklist for every district to make sure you’ve appropriately placed these elements (or not – perhaps no taverns allowed in the religious district). Decide if each district needs one or multiple of these elements, and in what concentration. Doing this will bring a beautiful unifying theme across your map, emphasizing that it is one city. I use color to highlight these elements, but they can be done with other methods (certain buildings, effects or spacing).
Here are some examples of common elements I’ve used in New Cassia:
Inns & Taverns

Most cities will be full of houses of lodging, food, recreation and of course drinking. You can easily consider those to be some of the buildings laid down by the Random Street tool, but I wanted to specially call out these buildings by having a unique brown-colored roof (a rarity in the city) as helpful waypoints wherever adventurers may be – they always know they can stop nearby. I tried to ensure that at any given point, there is a tavern close by, except for some of the poorer districts, or the religious district. Continue reading »
Comments Off on Bringing your City to Life – Part 5 (by Ari Gilder)
Sue Daniel | May 9, 2020 | CD3, city, city design, city mapping, city planning, mapping cities, Sue Daniel
 Welcome to a brief article about the creation of Orde-on-the-Rock (or just Orde for short), in which I will be attempting to answer most of the questions I have been asked about this map since it was first released last year as a new example map for City Designer 3.
Orde was designed as a map to demonstrate what could be done with CD3 without using any additional add-ons or extra art assets.
Over the years I’ve been using CD3 I’ve done lots of cities using only the assets that come with CD3, so to make it more of a challenge for myself this time I decided not to use any of the regular Bitmap A house symbols. In their place I used buildings generated by the Building and Street tools, and added a few shaded polygon constructions for variety. Continue reading »
2 Comments
Clercon | May 3, 2012 | CD3, city, city planning, Par lindstrom, Tutorial
Originally posted on mappingworlds.wordpress.com
In this post we will create the outskirts of the city, farmlands and the ruins. First of all you have to decide what parts of the city that will be farmland and what part will be ruins. In this map I wanted to create the feeling that the city is situated in the middle of an old ruined city. The two closest islands to the east and west of the city will consist of farmland. Those areas are close to the city and will be easy to protect as well. On the north part of the western island you can also see that a part of the old city wall has been taken into use again, to protect the city from whatever hides outside.
When I create farmland I always start by putting in all the roads and houses. Usually you will have a cluster of houses just outside the city gates, the further away you get from the gates the more space you will have between houses. I then select the city hedge drawing tools and start to mark out the area where the fields will be. I’m actually using the same technique here as I do when I’m making smaller towns. For a more thorough explanation on how I draw the fields see my Mapping a small town part 4 post over at my mappingworlds blog.
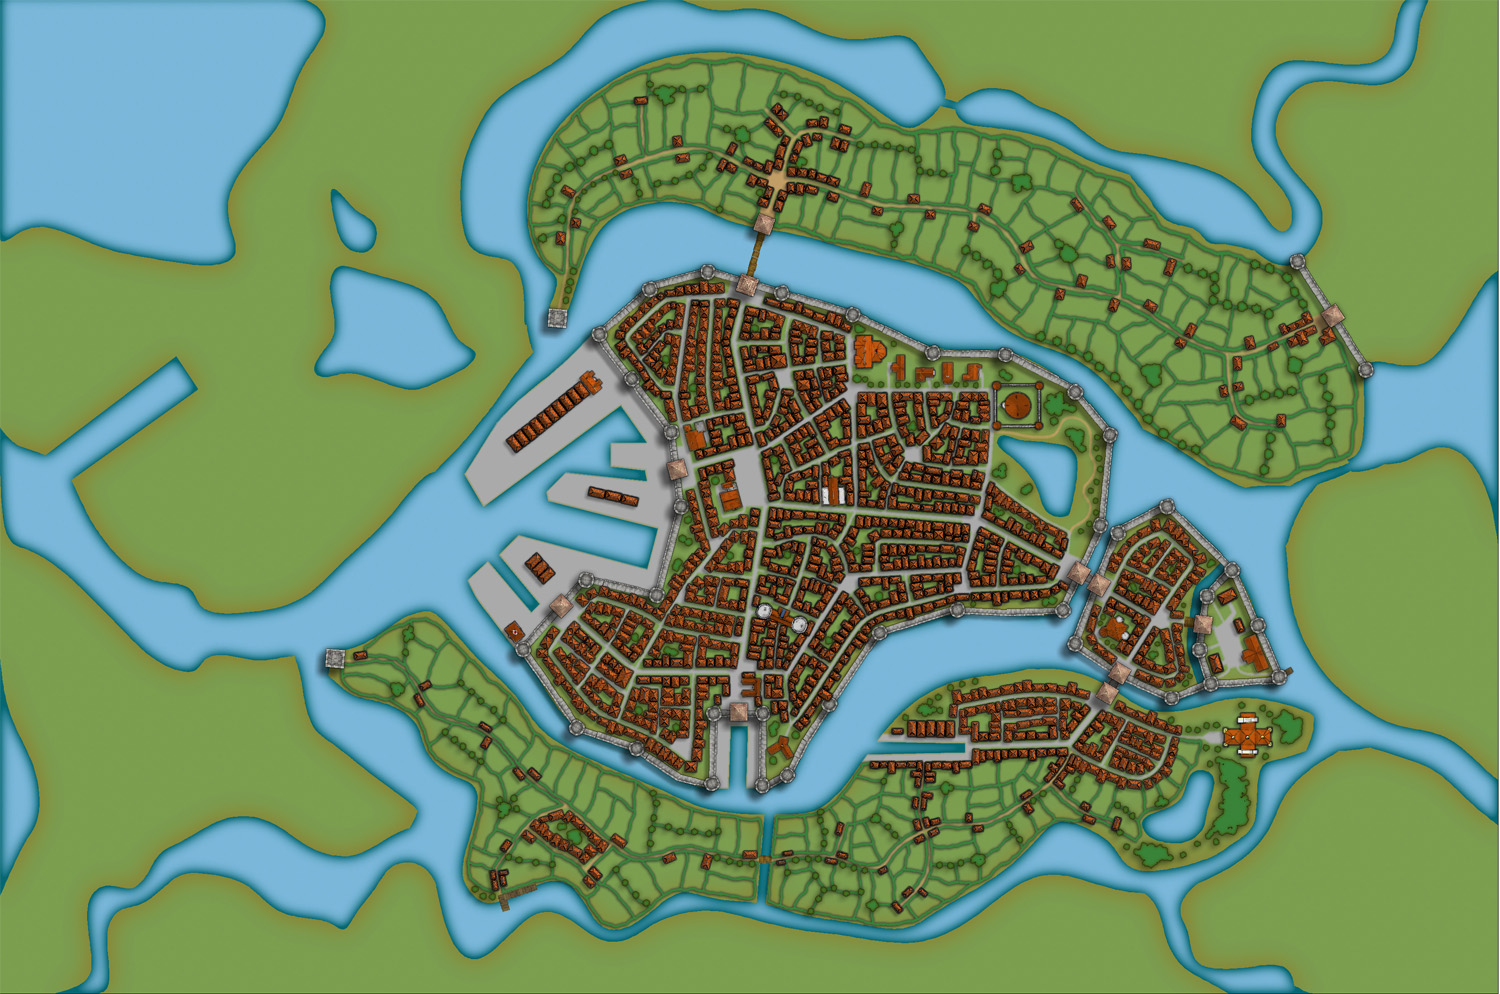
When I’m done with all the fields the map looks like the picture below, so still some ruins to place.
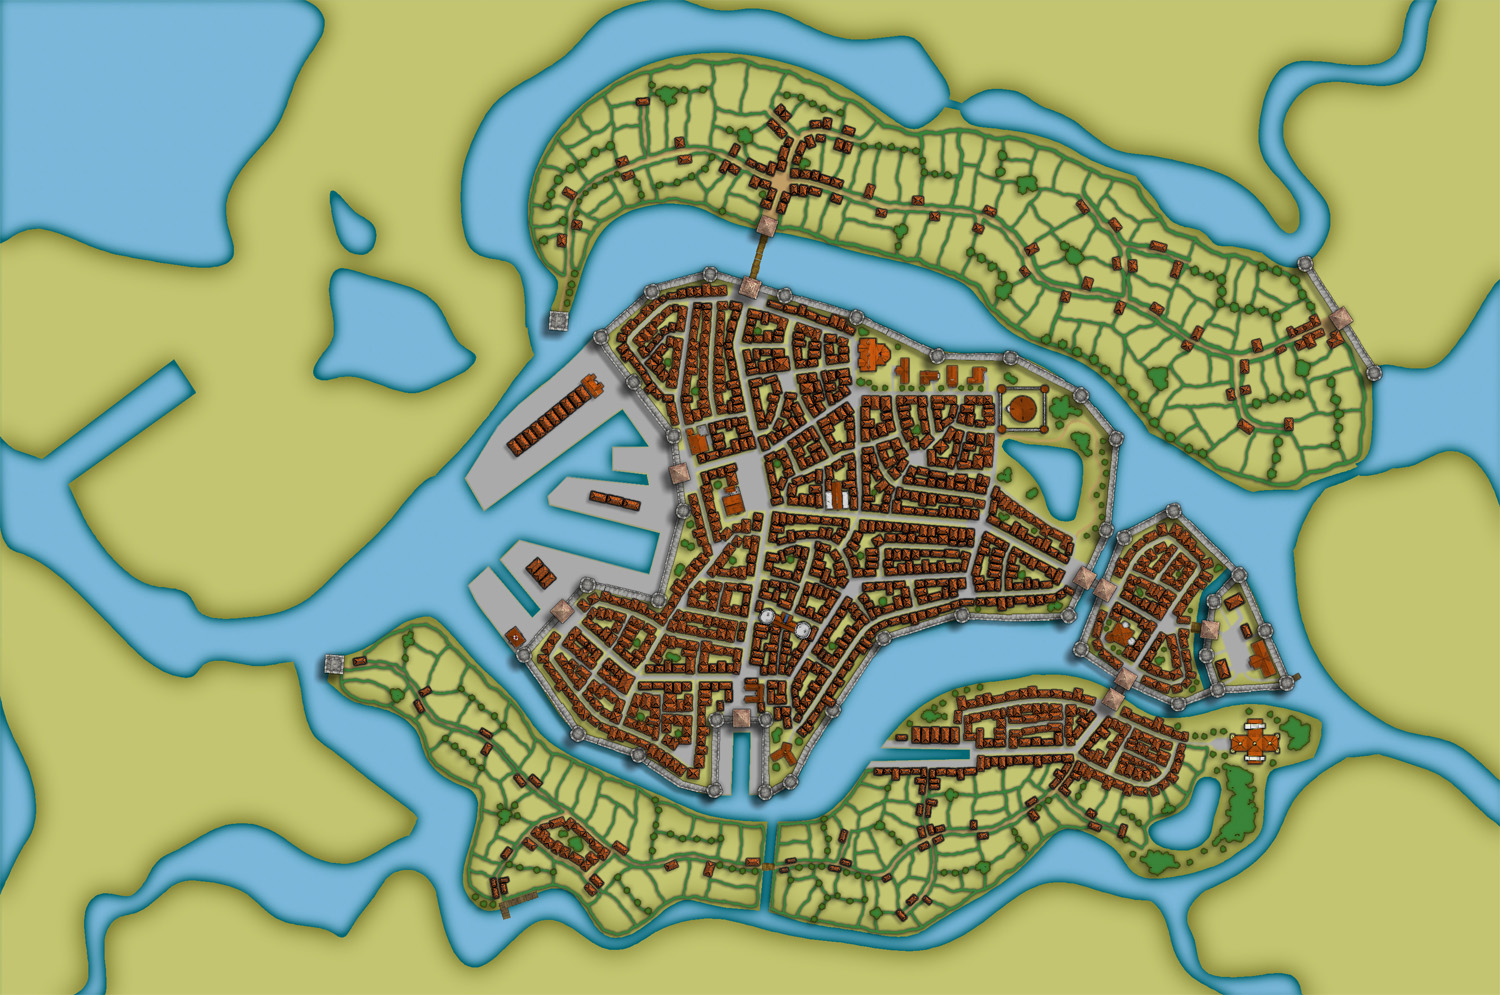
To complete the fields in the map I also export a map from CD3 where all the land is yellow. In this way I can combine them in Photoshop and paint in some yellow fields among the green ones. This will give you a more natural look than if the fields are just green. See my Mapping a small town part 6 post for more info on how to do this. The yellow version of the map looks like the picture below.
You can of course add in all the yellow fields in CD3, but I’ve found that to be a lot more time consuming then doing it by combining the two pictures above in a third party program. This program doesn’t need to be Photoshop, use the program that you feel comfortable with.
The next step would be to add in some ruins in the picture. Here I must say that CD3 didn’t really have any good styles to work with to get the look I wanted, so I had to make something up myself. Creating a completely new style wasn’t something I felt I had the time or knowledge to do, but I think a good ruined city style would be a great style add on in a future Annual. Sure you have some ruins in the program that you can use, but for me a ruined city mainly consists of the foundations of the houses and maybe some larger, more intact, buildings.
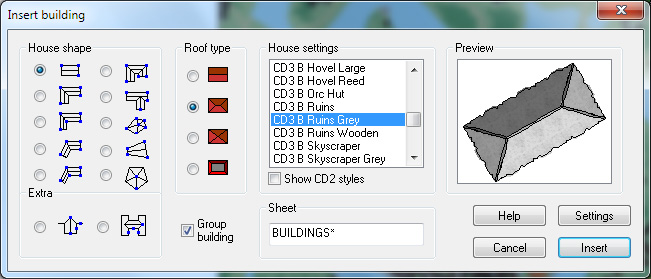
So I decided to draw in some random roads and houses using the CD3 B Ruins Grey buildings. They’re not perfect, but they are a good base symbol to continue working from.
When I’ve put in all the roads and larger buildings in the map I’d export it again from CD3. This means that I now have three different versions of the map, which I’m going to put together in Photoshop, the two different ones with yellow and green fields and this one with a green background and ruins in the outskirts of the city.
At this stage I had to work on the ruins a bit in Photoshop to make them look more like ruins. If you put the map with ruins in one layer and put it on top of a layer consisting of the map with green fields. You can start to erase bits and pieces from the top layer, when you do this the layer below will be visible instead of the top one. In this way I erased all the inner parts of the buildings, which left something that looked more like the foundation of a house. I also erased parts of the larger buildings to make them look more like ruins with broken roofs and missing walls.

In the picture above you can see a part of the map where you have the ruins as they look in CD3 on the left side, and how they turned out after some editing in Photoshop on the right side. In my opinion the right side looks more like ruins then the left side. Or at least more like the ruins I wanted in this particular map.
1 Comment
Clercon | April 16, 2012 | CD3, city, city planning, mapping cities, Par lindstrom
Originally posted on mappingworlds.wordpress.com
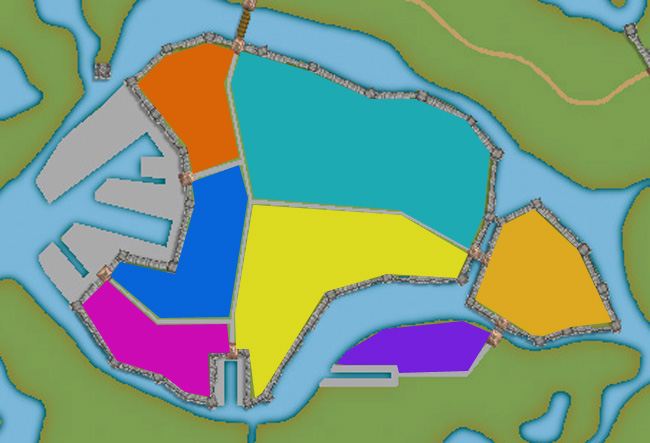
We now have the basic layout of the city. Next step is to put in more roads and try to decide where to place the majority of buildings. Sometimes when you create a large city the process of placing all the houses can be overwhelming. To make this easier I try to divide the city into smaller areas. I then place the houses one area at the time. In this way you divide the work into smaller goals that you can reach quite quick. It will make the whole process much easier. In the picture below you can see how I’ve divided the city of lost souls into seven areas to fill it with houses. Make every area interesting by adding a major house, villa or temple in it. It will add some details to your city and will make the end product more fun to look at.
At this stage I also try to locate where the major squares will be, naturally they will be situated where the large roads meet up. I also like to add some smaller squares in front of the gates, usually this is where people have to wait to get in and out of the city. You also have to decide what density your city will have. Nearly all cities have some sort of park or green area, older cities could actually have quite a lot of farmland inside the walls. In this case how ever the farmlands are outside the city walls.
When I start to place the houses I zoom in and out to quite a lot to check the progress of the area I’m doing to make sure that the network of roads and houses looks natural. A good thing to think about is if the area you’re making is planned or if it has grown over time. To understand the difference in how a planned city looks compared to one that has grown over time you can look at some modern cities in USA (for example New York) and compare it to some older ones in Europe (for example Venice). The planned ones tend to have straight roads in squares and the grown ones usually have roads and city blocks in all kind of versions. At first you can’t really see any logic in the city construction, but after a while you will start to see that roads lead between squares and larger empty areas usually consist of an important building and its surroundings.
When I start to map an area I always start with the roads. First I add in some larger main roads, I then switch to a smaller road to make intersections between the larger roads. In the picture below you can see a nearly finished inner part of the city. I’m working on the last area and have put in the roads and squares. The squares I try to place in areas that feel natural. Also try to have some space between squares, a square is a place to meet and trade, so they will be evenly spread out in the city.

When I add houses to a city or town I always start by using the Random street tool. The ability to quickly add all houses on a street is one of City Designer 3′s best advantages. When you’ve added a lot of streets it isn’t always possible to use the Random street tool everywhere, in those cases I add the houses one by one. Sometimes you also have to go back after adding houses with the Random street tool and delete houses that don’t fit in for one reason or another.
When I use the Ramdom street tool I try to make the houses come as close to each other as possible. To do that you have to change the settings a bit. Right click on the Random street tool icon and in the street option window you click the Street settings button. The settings I used for the map you can see in the picture below.
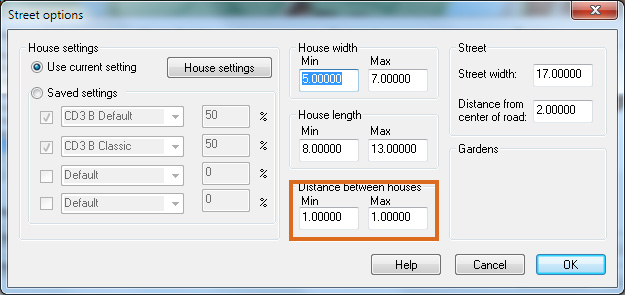
The most important setting is the Distance between houses that I always set to 1, both as Min and Max value. In this way you will get the houses as close as possible togehther. The other values depend on the scale of the map that you’re doing. You have to try some different settings here and see what works out.
When you’ve added houses to all your areas in the town you are done with the central parts of your city. Don’t forget to zoom out once in a while and check that the streets look good. I often have to go back and add some more roads to make the city more crowded. In the next post we will start on the outskirts of the city, farmlands and ruins.
Comments Off on Making a City part 3
Clercon | April 5, 2012 | CD3, city, city planning, mapping cities, Par lindstrom
Okay, so far we have the landscape where the city will be situated. When creating the City of the Lost I combined graphics from three different styles in City designer 3. First of all the actual landscape, which is what we have at the moment, is made in City style A. Later on when I add in houses I mainly use the graphics from City style B. The reason for this is that those houses looks more painted then the one in style A. which look more 3d generated. Which one to prefer is up to you, but in the maps I do the style B graphics are better suited. In this map I’m also using some graphics from the Profantasy March annual, Jon Roberts city style. In that style I’m especially fond of the city walls and towers. However the walls in this style are a bit harder to place due to being built from a static graphic file. So you have to watch the corners because they tend to create some gaps there. A good way to hide this is to place a tower on the “bad” spot.
When I start a new town I usually always start by building the town wall and deciding where the gates will be. In this way you will get a clear view and idea on where the majority of houses will be placed, so you can plan ahead and get a good balance in the map. In this particular map we also have three different docks, one larger and two smaller ones. In older cities the docks were often situated outside the city walls. In this way you could both tax the goods efficiently when they were entering the actual city and you also didn’t need to compromise the security of the town. So I’m placing the two docks on the central island outside the walls. The small third dock, however, is situated in an area where you have no walls. This dock is probably used for more local trading, not taking in ships from abroad. The idea with the docks is also that they are remnants from an earlier city that has been reused. So naturally it is around the docks that the “new” city is built.

Now, when we have the walls and gates of the city I put in the main roads. The logic here is that all main roads in a city usually will take you from gate A to gate B. Somewhere in between you will have some main areas like a square or a city hall etc. In this way you will also create some natural boundaries for different districts in your city. It will make it easier for you to plan the next step, adding more roads and start adding houses.
Comments Off on Making a City part 2
Clercon | March 29, 2012 | CD3, city, city planning, mapping cities, Par lindstrom
Originally posted on mappingworlds.wordpress.com
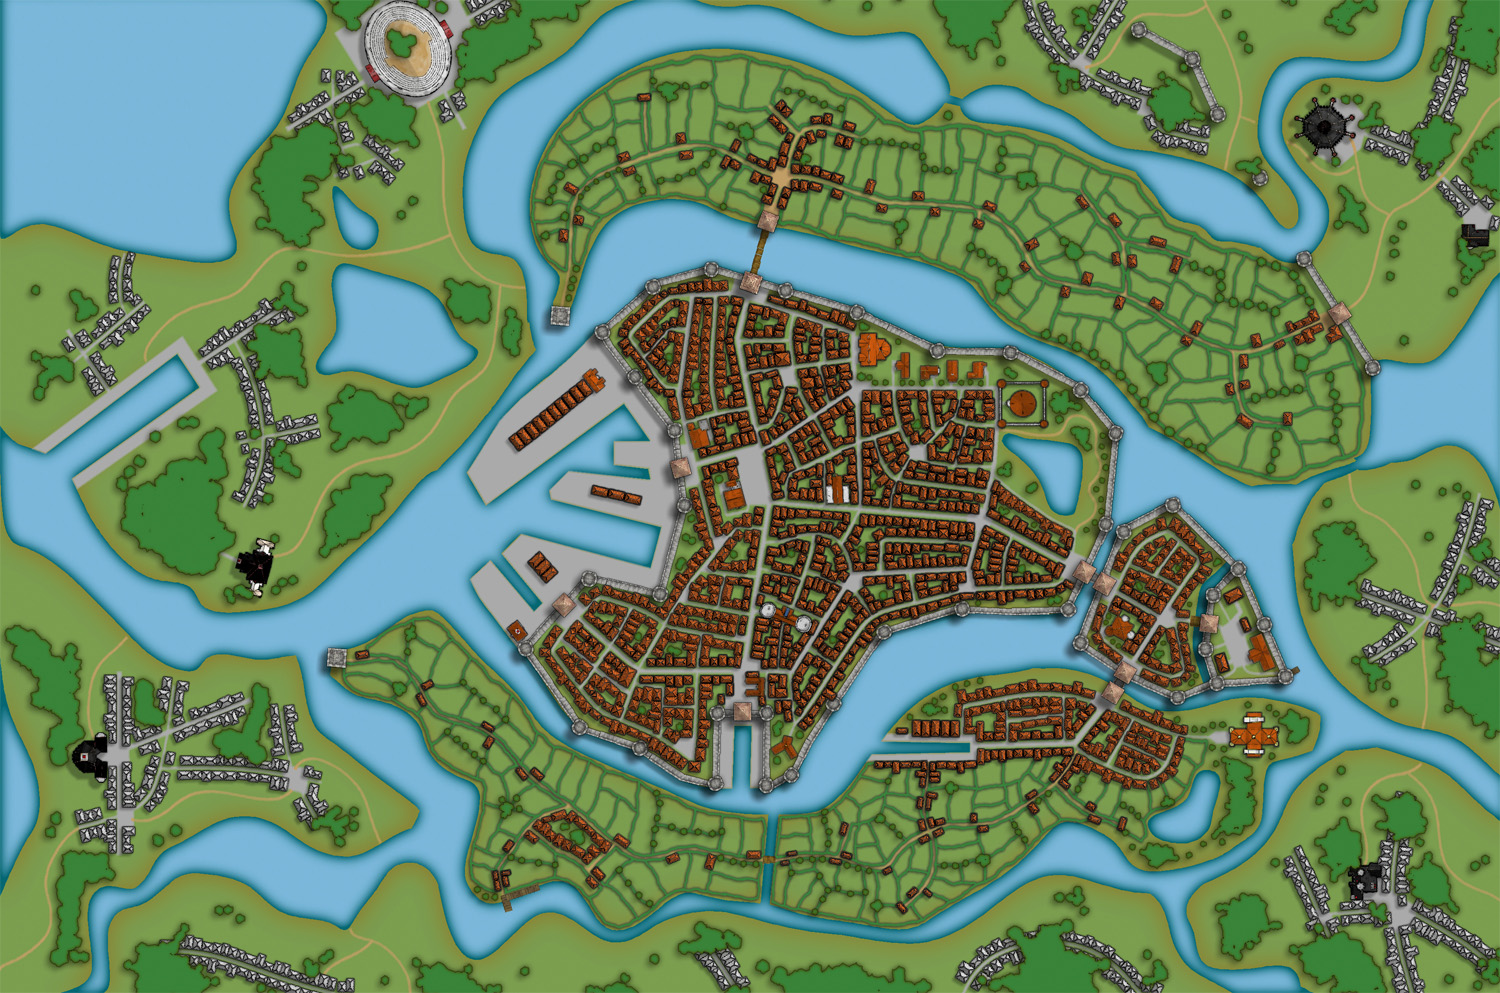
In my last post I presented the City of Lost Souls. The idea of the city has been in my mind for a long time as a city that originally was created by outcasts from the ordinary society. Outcasts that in the end have created a powerful city, a city made untouchable because of its location in the middle of a maze like river delta.
In this post and the next couple of post I’ll try to describe the process I’ve developed when I create cities. I don’t say that this is the best way to do it but it is one way to do it. To exemplify the process I’m using I will use the map of the City of Lost Souls.
When I decide to make a map it is always easier to start if you can get some inspiration from the real world. One of the best tools you can use is Google earth. You can learn tons of information just by moving around the globe looking at old cities, land formations and following rivers through the landscape. In this particular case I looked a lot at river deltas and cities situated at the end of rivers.
You will never find anything that will look exactly like the part you want to create, but the idea here is to find real world location that can inspire you, and that you can copy bits and pieces from. In this way you can create a map that will look much more convincing than if you just draw something from your head.

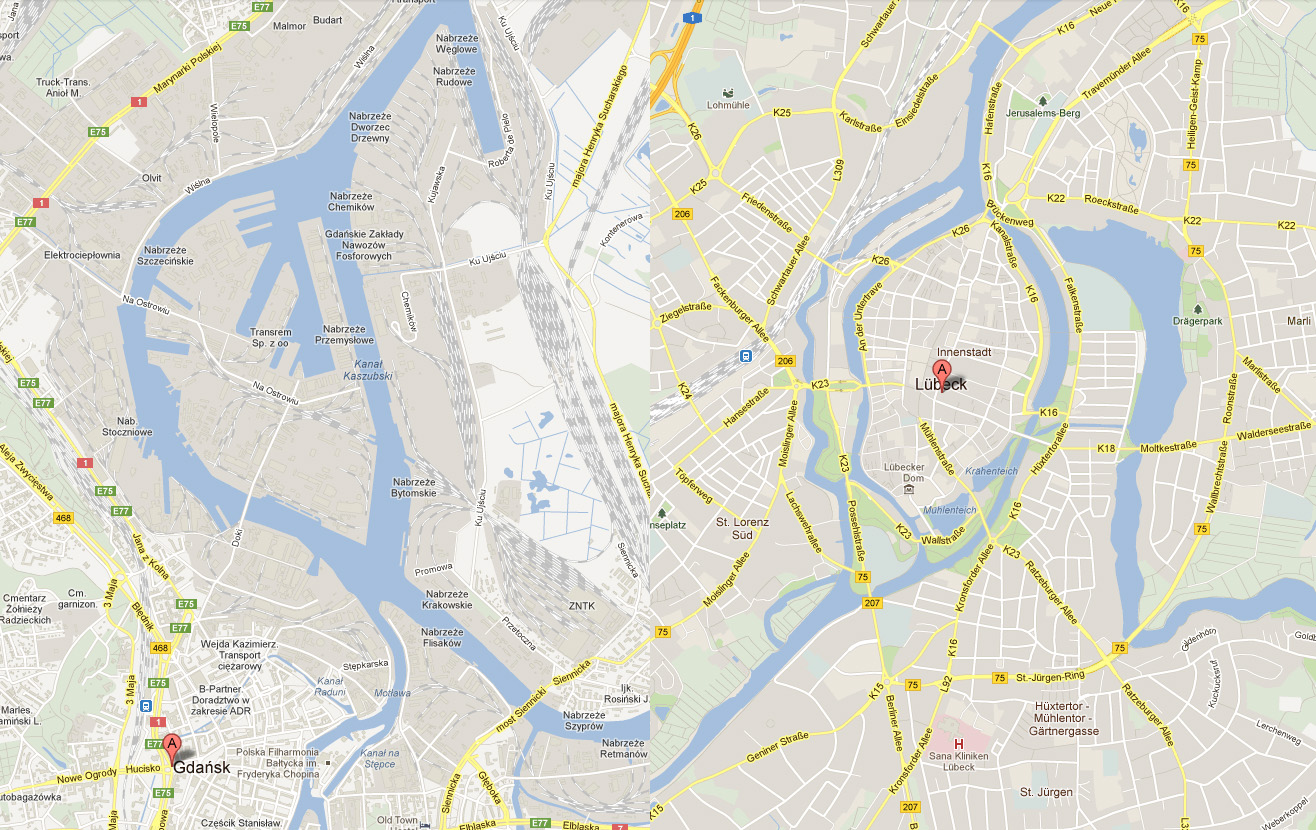
I soon found two cities that gave me the right feeling. These cities were Lübeck in the northern parts of Germany and Gdansk in Poland. None of them was perfect but I liked the flow of the river around the old part of Lübeck (as you can clearly see in the map), but this part missed a harbor. So I picked the harbor from Gdansk for the map. I also added in some more rivers to get the feeling that the city really is situated in a river delta.
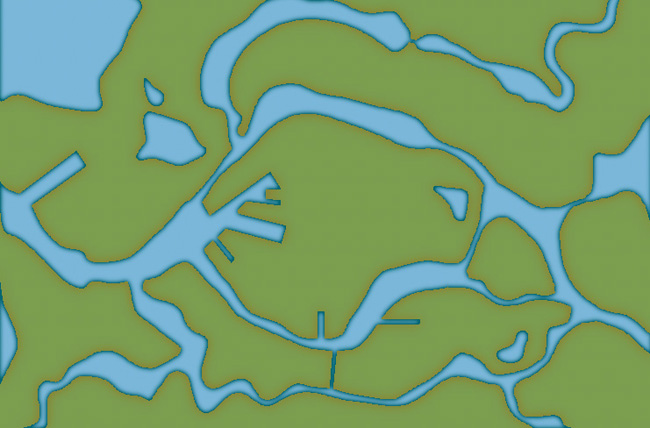
In City Designer 3 (CD3) I then started a new map and started to draw the rivers. During the process I looked at the cities for inspiration but still trying to do something original. While creating the island where the actual town would be I draw the outline of the harbor already at this stage. In this way the shadows between river and land would be right later on. So at this stage I had a quite clear picture on how I would progress with the city. In the picture below you can see the result when all the terrain was done. Next step would be to start on the actual city.
Comments Off on Making a City part 1
SteveDavies | February 6, 2012 | city planning, how to, mapping cities
First off, I apologize for the long lag between part 5 and 6 of this series: it was not my intention, but a series of life events conspired to take me away from mapping. But I’m back. Thanks to everyone for the kind words of support along the way.
If you need to refresh your memory about the project, here are links to Mapping Cities part 1, part 2, part 3, part 4, and part 5.
In this session, we’re going to fill in the blocks of our district with buildings, lots and lots of buildings.
We’re starting with the Entertainment district, which I’ve completely filled with block designations:
Continue reading »
Comments Off on Mapping Cities Part 6 – Filling Blocks in CC3
SteveDavies | July 12, 2011 | city planning
In this, the fourth part of our series on mapping cities, we will spend time setting up a district using Campaign Cartographer 3 (CC3). We will be using the City Designer 3 (CD3) add-on because it makes the job of mapping cities much easier. But pretty much everything we do in this tutorial can be accomplished with the based program – it’s just more work, and your style and building options are fewer.
When we get to the step of mapping individual buildings, you’ll definitely want to have a copy of CD3 because the end result is so much better.
We are going to rough out the entertainment district of our map (the red district just above center):

My original city map was created in an old version of CC3, so we’re going to copy the district and put it in a new map. Continue reading »
3 Comments
SteveDavies | June 21, 2011 | city planning
In the previous two installments of this series, we determined where a city is likely to arise, and did some basic planning for a city (read Mapping Cities Part One here and Part Two here). In this installment we will plan out a district in more detail.
There are four things to keep in mind when thinking about the structure of the district:
- Roads and Traffic: Are people mostly passing through (e.g., a gate ward) or heading to this district (e.g., a merchant area)? This will determine road size and pattern, with wider roads for main thoroughfares and places where livestock must travel.
- Planned or not? Cities rarely arise all at once, and different areas get different amounts of planning. Unplanned sections typically grow up along a road, or near a point of interest such as a well, then fill in between the spaces. Planned areas are more likely to have uniform plot sizes and more organized roads.
- Style of the buildings: Do the buildings face inward, typically toward and inner courtyard? Or do they face outward toward the street, typically with stores or other commercial endeavors facing the street. Buildings with courtyards will require more space.
- Density: Near the center of a city there is little open space – houses are more tightly packed. Further away from the center there is often room for livestock or family gardens.
Affecting all four of these mapping factors is the question of age: As districts age, they change and deviate from plans, space is filled in, walls are torn down, roads and squares infill. A fundamental right for city dwellers was the right to own land, and new cities are laid out in standard-sized burgage plots. The size of these plots vary from city to city, but are uniform within the city: Typically 10-20 meters wide facing the street, and 50-100 meters deep when first laid out.
The plots are large enough for outbuildings, keeping animals and small gardens. But as space pressure increases, the plots are subdivided and filled in. Usually the divisions stay within single plots, but the example below shows two plots that were split up together.
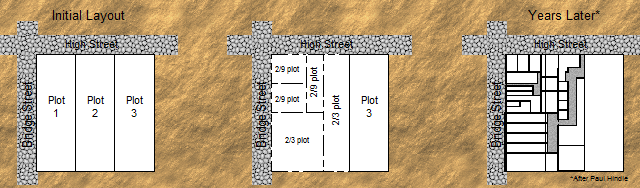
Over time city plots are filled and subdivided
As you lay out plots, you need to make sure that every building has access of some sort to the road, even if it is through an alley. In the example I give above, the grey areas are alleys. As you have ideas for points of interest, add them now or make notes for later.
I occasionally cheat and put in plot divisions that are not road-accessible. I just know that they will need a passageway through another building (maybe an arched gateway) or they need to be abandoned buildings that I can use later in my campaign.
Next time, I will show you how to apply these rules in Campaign Cartographer, using an entertainment district of my city.
The City Mapping Series
Part 1: Location, Location, Location
Part 2: Urban Planning
Part 3: Laying out Districts
Part 4: Districts in CC3
Part 5: Sizing Buildings
Part 6: Filling Blocks in CC3
Part 7: Houses Galore!
Part 8: Outside the Gates
3 Comments