ralf | January 24, 2019 | City Designer 3, city mapping, guest article, Jay Johnson, user tutorials
We’re continuing Jay Johnson’s City Mapping article with the third and final part.
Adding Details
 Little details add a great deal to a map. Look at these two images. The first is with trees and pathways in the courtyards. The second is without them. How much difference do these details make in your opinion? In my opinion, they make a big difference.
Shadows
Another detail you can work on is your shadows. I adjusted the shadow settings on my buildings so they intrude more into the streets. The places where the streets are covered in shadow creates a sense of danger and mystery, don’t you think.
The City’s History
 Think about your city’s history and include details that suggest a city that has evolved. Your city should have a nucleus (the original settlement) from which it expanded. Consider how this expansion took place and the different phases through which it occurred. Think about how your city has grown. If there were old walls, roads that ran beside them most likely now mark where they once were. Maybe sections of these walls still stand or roads pass beneath old gates that are located far from what is now the city’s perimeter. What other changes may have occurred as your city grew?
Some More Advanced Techniques
Let’s take a minute to talk about some more advanced techniques I have used. Some that require using other programs in conjunction with CC3+ and its add-ons. Continue reading »
Comments Off on Mapping Cities with CC3+ by Jay Johnson – Part 3
ralf | December 18, 2018 | city mapping, guest article, Jay Johnson
We continue Jay Johnson’t city mapping article with part 2. Go here for part 1.
 Building Construction Techniques
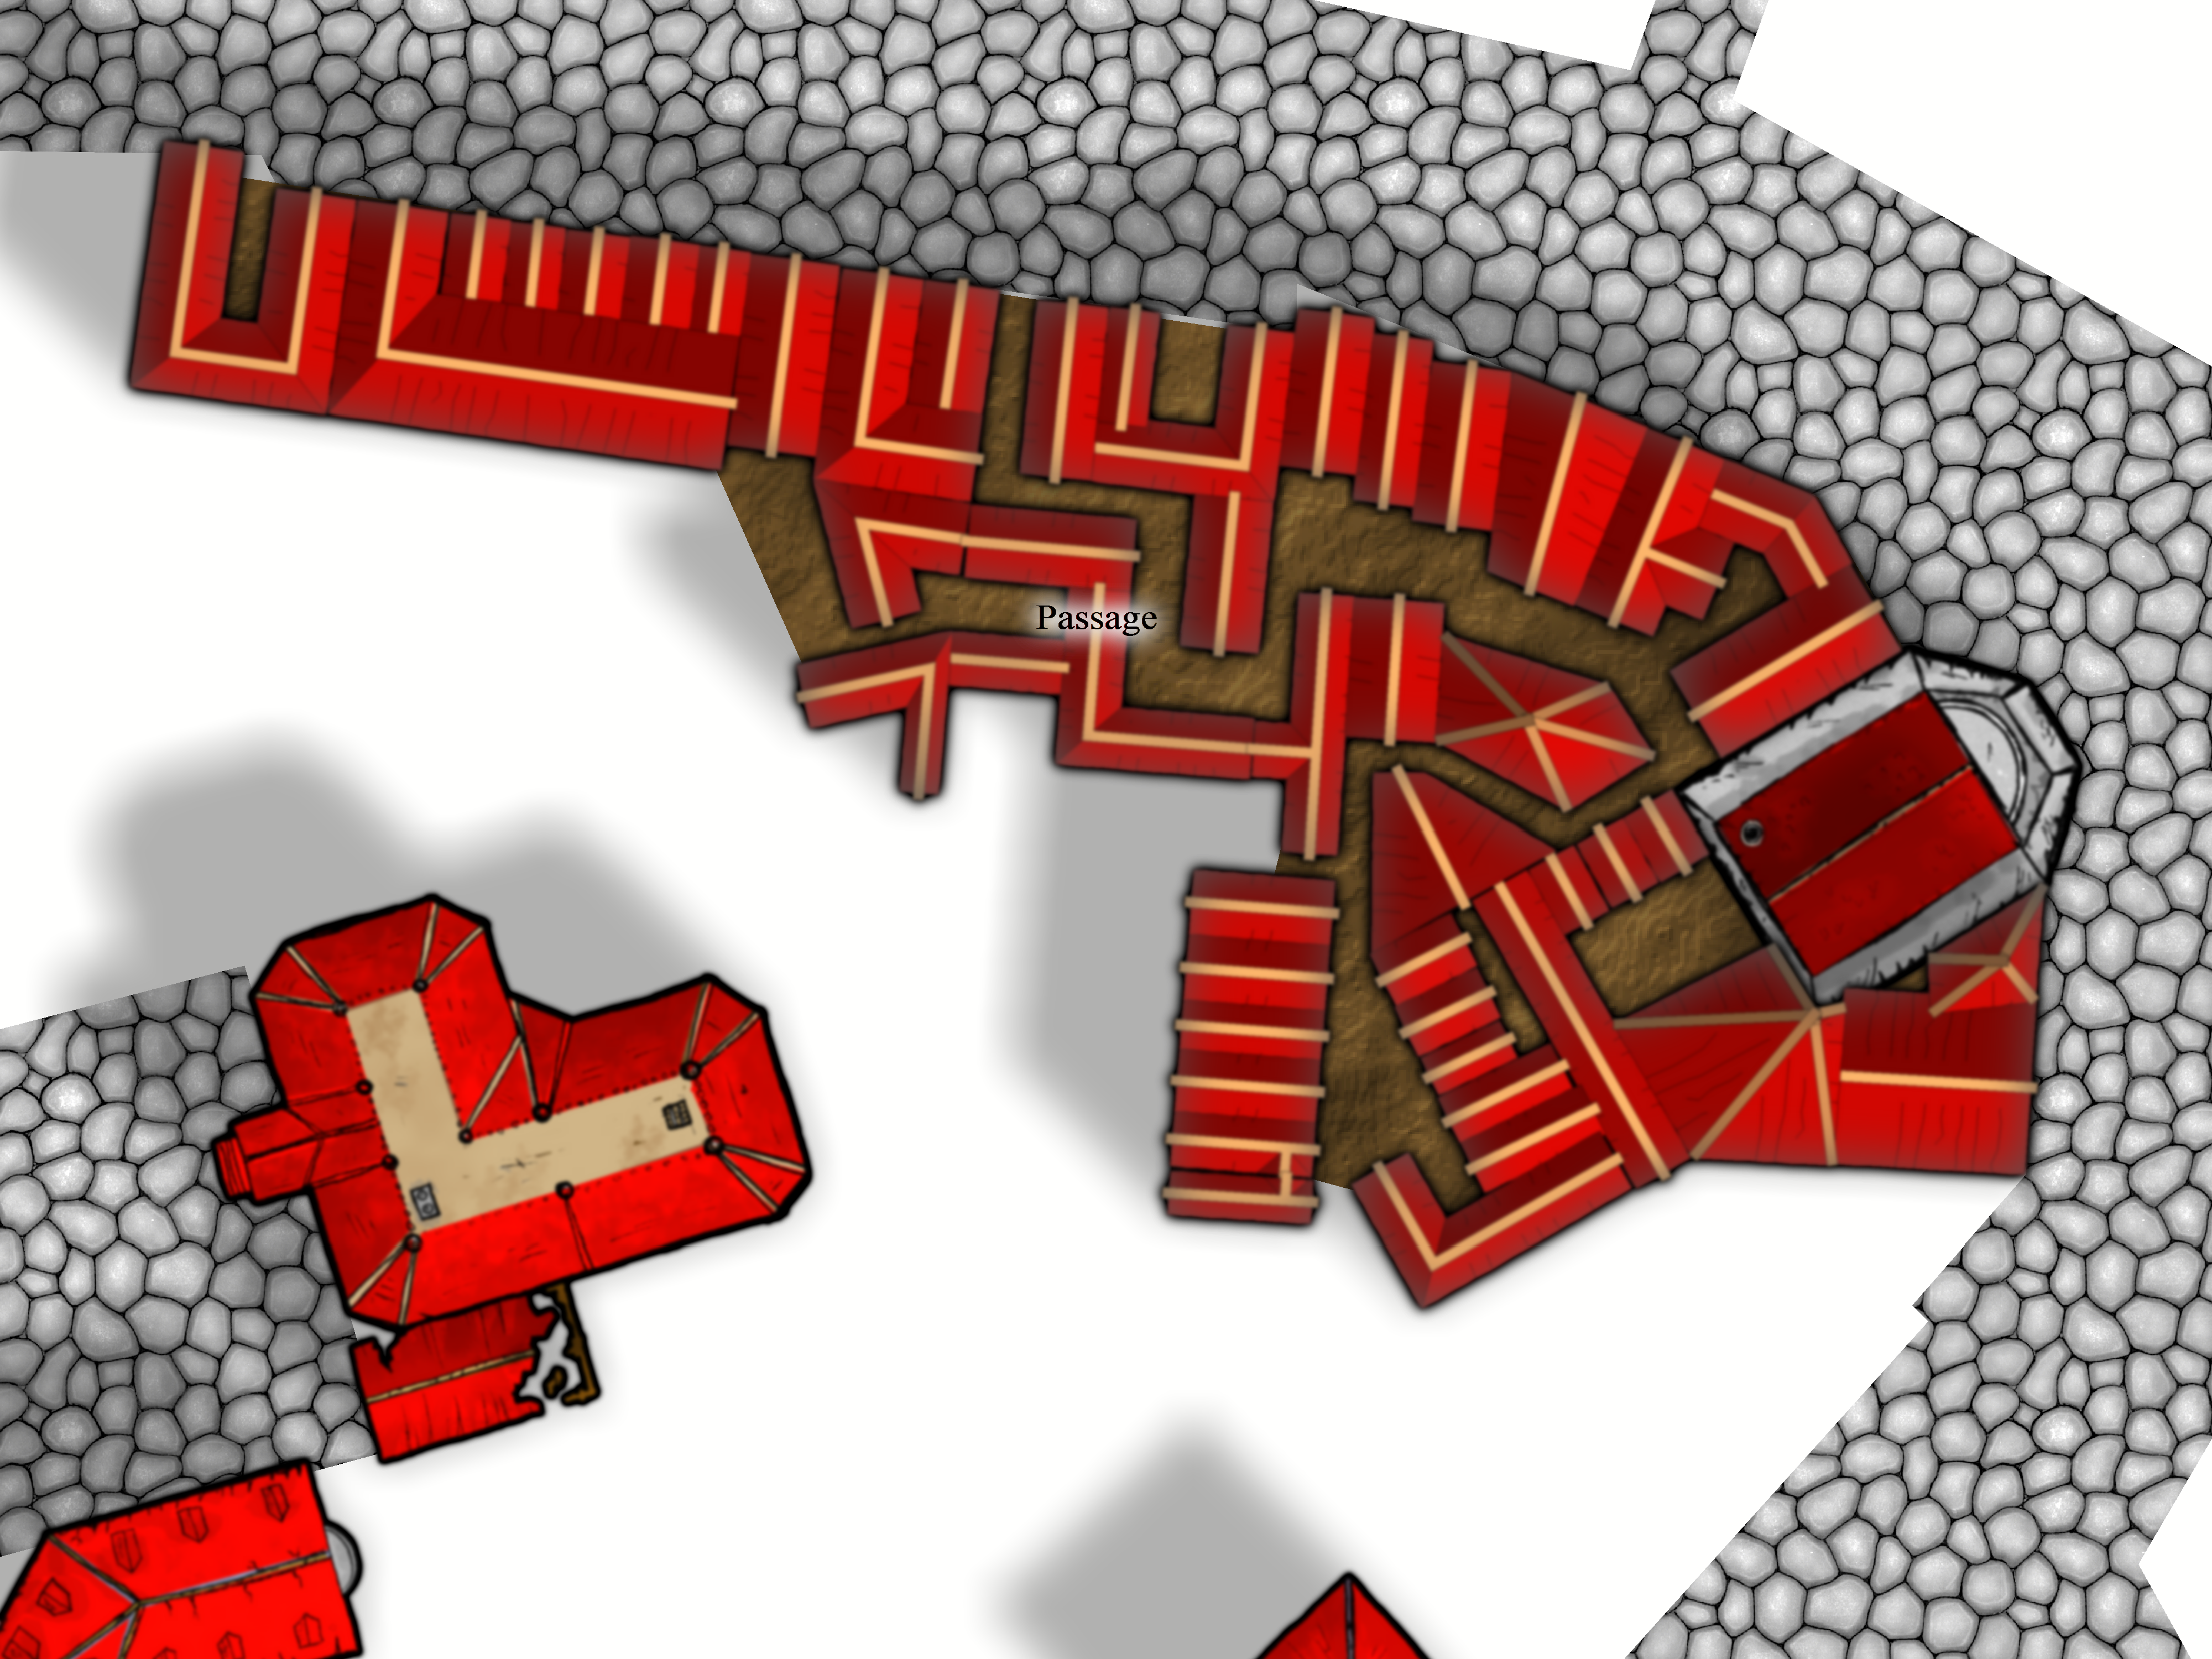
I think we are at the point where I should talk about some of my building construction methods. Here are some techniques for making complex structures utilizing the HBT.
Splicing
The first building we will construct is what I will call the Building with Enclosed Courtyard. The technique I used for this can be used to construct all kinds of variations and is also what I used to construct the city walls around Melekhir. We will refer to this technique as splicing.
First choose the building style you want in the HBT. Ensure the House shape is set to option nine which is the trapezoid shape and the Roof type to option one which is gable.

Continue reading »
2 Comments
ralf | November 20, 2018 | city mapping, guest article, Jay Johnson
Before we get started with our conversation about mapping cities with Campaign Cartographer 3 Plus (CC3+), I should probably introduce myself. My name is Jay Johnson and I go by Texas Jake on both the ProFantasy Forum and the Cartographers Guild Forum. I have always loved maps and history and I am a bit of a perfectionist by nature. You can see examples of my maps on the ProFantasy Forum. My map of the border outpost of Tarkas was one of the ProFantasy Blog’s Maps of the Month for October 2018. You can also view the current map I am working on of the City of Melekhir. It is a map of a city that covers over one square mile of land area (that’s massive, what was I thinking when I started such a ginormous project!).
When I purchased CC3+ (to make a map for a series of books I am writing) and started down the road of mapping, I had no idea all I would discover—about the use of CC3+, about medieval cities and about the art of mapmaking. CC3+ opened up a whole new world of mapmaking to me. I started by doing some overland mapping (and was astonished by the quality of maps I could produce while still learning the basics of the program), but it wasn’t long before I ventured into the realm of city mapping. Mapping cities can be challenging, fun, sometimes frustrating, but in the end quite rewarding. I would like to take this opportunity to share some of what I have learned along the way.
First, let me define what kind of cities we are talking about. The type of cities we will be discussing are fantasy cities based on those from medieval Europe. The kind that can be found in many of the fantasy stories we have read or viewed. The purpose of our conversation is to learn not only the use of CC3+ to make maps of cities, but also to learn about the art of making city maps.
It could be argued that the art of mapmaking is more important to making good maps than the tools you use to accomplish it. I believe there is some truth to this argument. I would go on to say that a good mapmaker can make a good map whether he or she uses pen and paper, Photoshop, or CC3+. The more we understand about making a readable and believable map, the better map we will make regardless of the tools or medium we choose. Our objective is to make a map that effectively communicates to the viewer the information we desire to convey. If we fail to do this, everything else we do is pointless. We also want to make a believable map. To do this, we need to avoid pitfalls like using magic as an excuse to justify something that would be implausible in the real world. If we do deviate from the norm, there should be a good reason for doing so. We can make exceptions to reality, but they should be made for a reason, not as an excuse. Understand that the more exceptions we make, the less believable our map becomes.
As we make this journey together, I am going to assume a few things, one of them is that you have the City Designer 3 (CD3) add-on. We will be making use of tools and elements from CD3 and since I bought the Top Three bundle when I got CC3+ (which includes CD3 and Dungeon Designer 3), I am less conscious of what tool came with which product.
Let’s Get Started
Where to start? Now that is the question. Let’s start by determining what kind of city we want to map. You must think about the size of the city you plan to map and determine the size canvas you will need to map it on. If you are just starting on your journey as a mapmaker, this can be a hard question to answer accurately. I know that I have had to restart maps several times because I answered this question incorrectly. The problem of fantasy mapping is that we define what we are mapping and we create the data. If our conception of what we want is not entirely clear, we open the door for inaccurate conclusions to enter. So, take a little time and think about how big your city is going to be and then you may want to allow yourself just a bit more space than that. It is good to allow extra space so that the shape of your city is defined by design and not by the constraints of your canvas. How many times do fantasy cities end up square or rectangular because that is the boundaries of the canvas. Our cities should be defined by their terrain, not by our canvas. Do your research. Know as much as you reasonably can about your city before you start to draw it out. Understand, of course, you will learn more as you put it down on (digital) paper. Sometimes the discovery may amaze and surprise you.
A resource that may help you is this site which has many historic city maps.
If you are new to CC3+, get to know the software. You need to gain a bit of skill with your tools. One of the first things I did when I was new to CC3+ was watch the excellent videos by Joe Sweeney to get a handle on the software. You can find his videos here. After watching some of his videos I would do some mapping with CC3+. When I had a question or encountered a problem I would go back for more or break out the manual. One of the best ways to learn is by doing (at least for me it is). Make a few practice maps to develop some familiarity with the product. I have heard complaints that CC3+ is hard to learn. There is a bit of a learning curve to it, but there is with any product. I promise you if you put in the effort to learn to use the software you will be rewarded—and you will get past the steep end of the learning curve faster than you may think if you are diligent.
Another tremendous resource is the Tome of Ultimate Mapping by Remy Monsen. It is available from ProFantasy and is a wealth of knowledge. It also includes an excellent tutorial on mapping cities to help you learn the basics.
Your city should have a reason for being. What resources are available: minerals, lumber, stone, etc.? There must be sources of food and water (unless, of course, your inhabitants are stone statues that do not eat or drink, but I think they are probably not). What about trade routes? Think about these things and their locations in relation to your city and what impact they have on it.
After you have determined the size of your city and have achieved some degree of proficiency in the use of CC3+, you need to determine what CC3+ style you want to use for your city. Understand you can
borrow elements from other styles to supplement your choice. You can even create your own style if you care to. If you are unfamiliar with CC3+ city styles I would recommend making a small sample map with the styles you are considering to see which one will best suit your needs.
Time to Make a Map
 Okay, now let’s get into my process for mapping cities (finally, you say). The first thing I do is define the terrain. If you’re mapping a city that is on an overland map, you can look to that map for information. Locate the hills, the mountains, and very importantly, the rivers. After you define the terrain, determine the location of the city on the terrain.
The next thing I do is lay out the major roads. The roads that connect the cities to the rest of the world and resources and the roads that are the major arteries inside your city. This will give you a skeleton, so to speak, to work off of and flesh out. At this stage I determine where the main marketplace will be. If there is a castle or palace, this would be a good time to locate it. It will influence your roads and was probably there before, or near to the beginning of, the city. During this stage it is also good to consider what important structures, locations and features you want to include in your city—maybe an important temple, or a large arena where chariots race or gladiators fight. Now would be a good time to place them on the map. That way you make sure there is a place for them, and major sites like these will have a great influence on your road network.
When you place buildings, you can put roads down first then add the buildings or you can add the buildings then place the roads. I have done it both ways and either will work. It is a matter of preference and, at different points in your mapping, one way may prove better for you than the other.
Talking about buildings. If you look at historic maps and at old sections of cities that have survived from the medieval period, buildings tend to be built right up against each other. They are also right on the street, not set back as is common in the residential neighborhoods many of us are familiar with. This will be the preferred situation in our map. Because of this, the random street tool (which is great for laying down houses fast) will not be our preferred method of adding buildings. I also don’t use the premade buildings very often in my maps. I prefer to make my own using the House Builder Tool (which we will henceforth refer to as the HBT). This allows us to have much greater flexibility concerning the design of the buildings we are placing on our map.
When I was early in the process of mapping out Melekhir, I struggled to come up with convincing-looking buildings and building clusters. After several attempts (which I quickly deleted) I stumbled on an ingenious idea (okay, maybe ingenious is a bit much). I decided to bring up the city of Rothenburg ob der Tauber in Google Earth and copy some buildings. Why Rothenburg? Because I had visited the city a few times when I was living in Germany and I knew it was an authentic walled city that had maintained its medieval charm. I replicated a few buildings—they weren’t exact copies—but I liked the results. I copied a block of buildings and I really liked the results. Hey, this felt authentic (of course it felt authentic because it was authentic). I copied several more sections of the old city. And you know what? After this exercise in replication, I was able to create buildings and clusters of my own that felt authentic. I had acquired a feel for it.

Let’s take a step back. Before I made this amazing discovery (okay, maybe amazing is a bit much also), I had used Google Earth to take measurements of streets and buildings and blocks of several historic cities. I recorded my findings and developed some standards to guide me in my mapping.
Did you know Google Earth has a nifty measure tool that will measure distance in meters (and also feet for us backwards Americans).
My measurements told me that main streets were usually between 16-18 meters (52-59 feet) wide, building face to building face. So, to keep it simple, I set my main streets at a width of fifty feet. Side streets were 6-8 meters (20-26 feet) wide, so I set my side streets at 20 or 25 feet wide. Alleys were as narrow as 4 meters (13 feet) so alleys would be approximately 12 feet wide. I also used my building measurements as a guide to how big buildings should be. Based on the measurement of several marketplaces I determined my main marketplace would be approximately 100 feet by 300 feet.
Grids
One of the first things I do when setting up a map in CC3+ is create several square grids on their own sheets, but on a common layer. This way I can turn them on and off individually. For a city map, I create the following grids: 5 feet, 25 feet, 100 feet, 250 feet, and 1000 feet (if the map is very large like Melekhir). I set the transparency of these grids to 50% or less so I can see through them and make sure they are contrasting colors (so I can distinguish between them). If you make sure they are all on the same layer you can turn on and off whatever combination is active via layers. These grids prove very valuable in keeping everything scaled properly. That said, I often map with them off once I get a feel for scale. If you do this, be sure to zoom out every once in a while. If you are working zoomed-in, things can get out of proportion to the rest of the map. I have stayed zoomed-in for extended periods of mapping only to zoom out and realize I have gotten dreadfully out of scale. That said, don’t be afraid to redo something that is off. If you fix it early it is usually a fairly simple and relatively painless operation (and you will be able to sleep at night knowing it is fixed).
The City Mapping article by Jay Johnson will continue next month.
Download Mapping Cities Part 1 as a pdf.
Jay Johnson is an aspiring author working on an epic fantasy series. He has always loved maps and, like many of us, was introduced to fantasy cartography through the works of J. R. R. Tolkien. His map-making has become an integral part of his writing process — a process he says often seems more like discovery than creation.
Comments Off on Mapping Cities with CC3+ by Jay Johnson
SteveDavies | May 8, 2012 | CD3, city, city design, mapping cities, Tutorial
Up to now we’ve mostly been working inside the city walls, where space is short and buildings necessarily packed

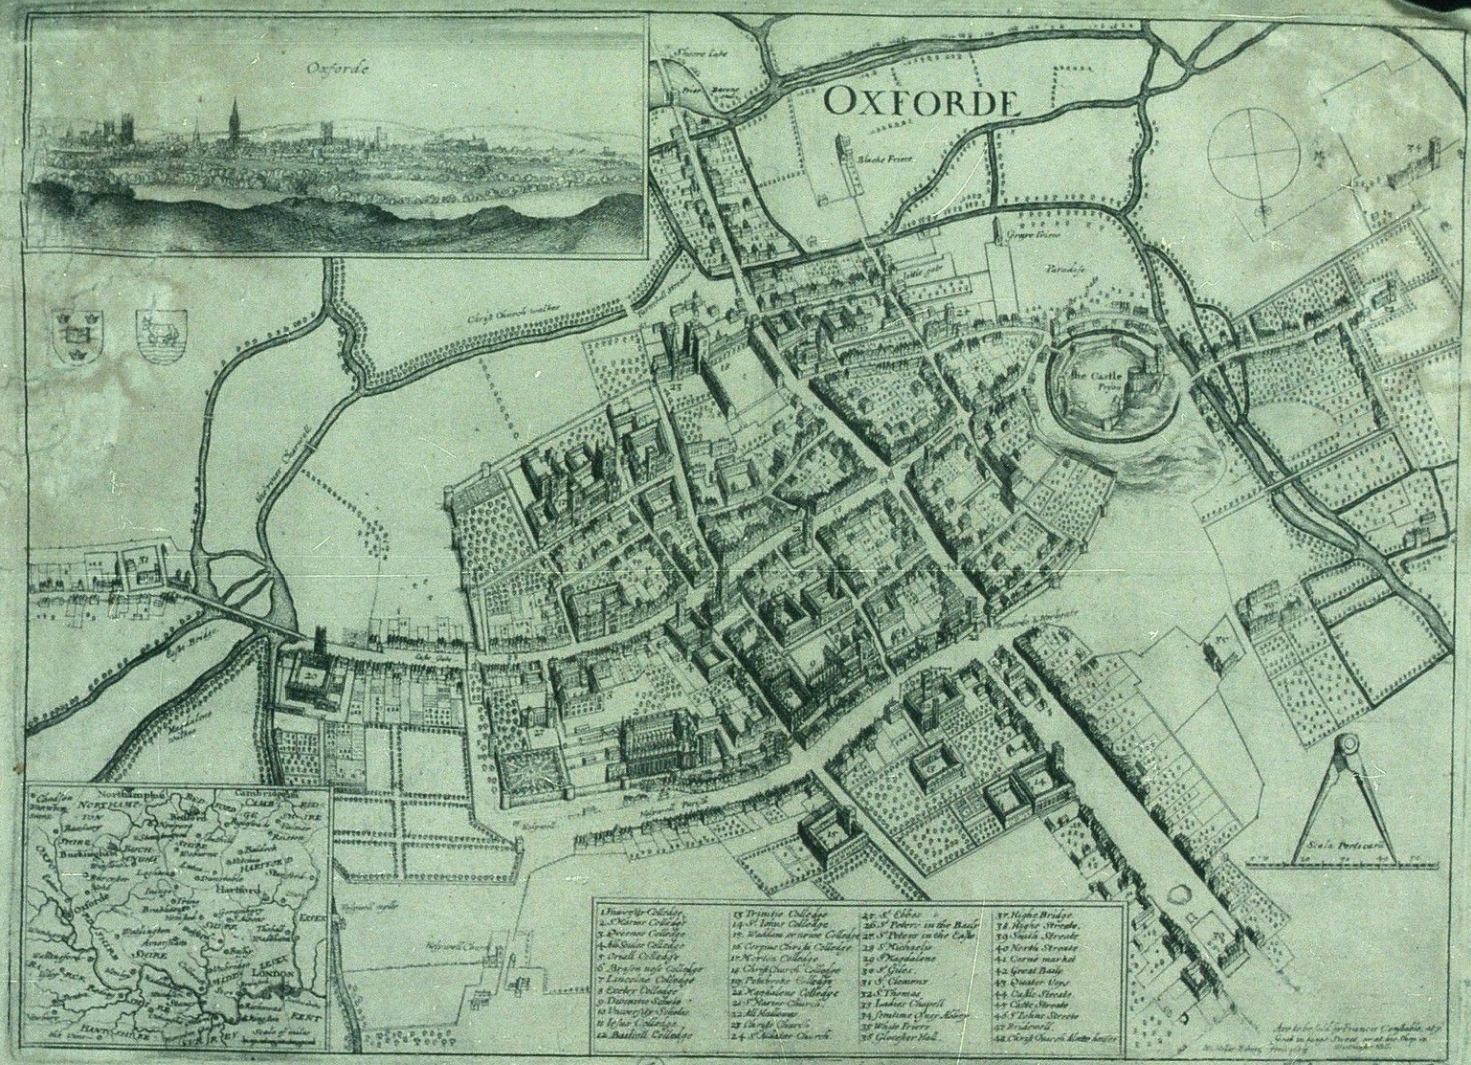
Historic map of Oxford in 1643
closely together. We’re now going to turn to the area outside the walls. In this installment, we’re going to turn back to some theory.
First we need to talk about why businesses decide to set up outside the walls of the city. After all, they are forgoing the protection that walls bring, so there must be some good reasons for it. It turns out the reasons are pretty simple:
- Avoiding authority: This is monetary, avoiding taxes, but also includes regulation, attention of the town watch, even to avoiding the prying eyes of neighbors. The city’s authority ends with the city walls, and some people find their business flourishes where there is less oversight.
- Accessing markets: Gates into the city are notorious choke points for people entering the city. The gates typically only open at certain times, guards ask questions, and just the physical size of the gate all conspire to leave large numbers of people waiting outside to get in. And where there are large numbers of people waiting or stranded, there is money to be made selling goods and services to them.
- Space: In many cities, space is at a premium. So businesses that require lots of space such as cattle markets, or that need space from neighbors, such as tanners, will often set up outside the city walls.
Continue reading »
1 Comment
SteveDavies | February 6, 2012 | city planning, how to, mapping cities
First off, I apologize for the long lag between part 5 and 6 of this series: it was not my intention, but a series of life events conspired to take me away from mapping. But I’m back. Thanks to everyone for the kind words of support along the way.
If you need to refresh your memory about the project, here are links to Mapping Cities part 1, part 2, part 3, part 4, and part 5.
In this session, we’re going to fill in the blocks of our district with buildings, lots and lots of buildings.
We’re starting with the Entertainment district, which I’ve completely filled with block designations:
Continue reading »
Comments Off on Mapping Cities Part 6 – Filling Blocks in CC3
SteveDavies | August 1, 2011 | building size, city mapping
We’re going to take a minute today to figure out reasonable sizes for the buildings in your city. I’m sharing some of my ‘rules of thumb’ for getting buildings that will work well. While you can finish a map without doing this, if you take a minute to make reasonable sized houses, your blocks will look better and it will be easier to just automatically convert a building from the city map into a tactical encounter map.
Our first order of business is to estimate the size of a pub. Why? Because it is a good reference size for all other business buildings.
Start by figuring out how many patrons the tavern should be able to handle comfortably. Let’s say for a given merchant-class ward, a typical pub should be able to handle 30 patrons easily. I assume that a nice tavern needs about 5’x5’ for each patron. If you want to ensure there is plenty of room for tactical roleplaying (in other words, a bar fight with lots of running around), you might double this. High end taverns might have 2-4 times as much space, and a cramped seedy bar might have half as much space.
So for our nice unassuming tavern that can serve 30 people, we will use 30 5’x5’ squares, which makes it roughly 30’x25’ in size.
An alternate way to get a rough size of typical buildings in our ward is to reference the symbol set that we’re going to use. Below I have two symbols from the symbol set I’m using.
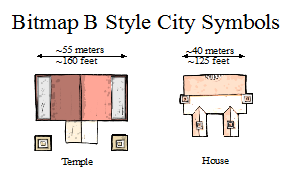
Standard CC3 City Symbols are landmark buildings
SteveDavies | July 12, 2011 | city planning
In this, the fourth part of our series on mapping cities, we will spend time setting up a district using Campaign Cartographer 3 (CC3). We will be using the City Designer 3 (CD3) add-on because it makes the job of mapping cities much easier. But pretty much everything we do in this tutorial can be accomplished with the based program – it’s just more work, and your style and building options are fewer.
When we get to the step of mapping individual buildings, you’ll definitely want to have a copy of CD3 because the end result is so much better.
We are going to rough out the entertainment district of our map (the red district just above center):

My original city map was created in an old version of CC3, so we’re going to copy the district and put it in a new map. Continue reading »
3 Comments
SteveDavies | June 21, 2011 | city planning
In the previous two installments of this series, we determined where a city is likely to arise, and did some basic planning for a city (read Mapping Cities Part One here and Part Two here). In this installment we will plan out a district in more detail.
There are four things to keep in mind when thinking about the structure of the district:
- Roads and Traffic: Are people mostly passing through (e.g., a gate ward) or heading to this district (e.g., a merchant area)? This will determine road size and pattern, with wider roads for main thoroughfares and places where livestock must travel.
- Planned or not? Cities rarely arise all at once, and different areas get different amounts of planning. Unplanned sections typically grow up along a road, or near a point of interest such as a well, then fill in between the spaces. Planned areas are more likely to have uniform plot sizes and more organized roads.
- Style of the buildings: Do the buildings face inward, typically toward and inner courtyard? Or do they face outward toward the street, typically with stores or other commercial endeavors facing the street. Buildings with courtyards will require more space.
- Density: Near the center of a city there is little open space – houses are more tightly packed. Further away from the center there is often room for livestock or family gardens.
Affecting all four of these mapping factors is the question of age: As districts age, they change and deviate from plans, space is filled in, walls are torn down, roads and squares infill. A fundamental right for city dwellers was the right to own land, and new cities are laid out in standard-sized burgage plots. The size of these plots vary from city to city, but are uniform within the city: Typically 10-20 meters wide facing the street, and 50-100 meters deep when first laid out.
The plots are large enough for outbuildings, keeping animals and small gardens. But as space pressure increases, the plots are subdivided and filled in. Usually the divisions stay within single plots, but the example below shows two plots that were split up together.
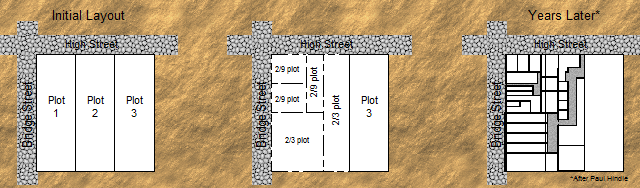
Over time city plots are filled and subdivided
As you lay out plots, you need to make sure that every building has access of some sort to the road, even if it is through an alley. In the example I give above, the grey areas are alleys. As you have ideas for points of interest, add them now or make notes for later.
I occasionally cheat and put in plot divisions that are not road-accessible. I just know that they will need a passageway through another building (maybe an arched gateway) or they need to be abandoned buildings that I can use later in my campaign.
Next time, I will show you how to apply these rules in Campaign Cartographer, using an entertainment district of my city.
The City Mapping Series
Part 1: Location, Location, Location
Part 2: Urban Planning
Part 3: Laying out Districts
Part 4: Districts in CC3
Part 5: Sizing Buildings
Part 6: Filling Blocks in CC3
Part 7: Houses Galore!
Part 8: Outside the Gates
3 Comments
Simon Rogers | March 21, 2011 | city planning
Location, Location, Location
by Steve Davies
Cities are one of the greatest environments for RPG adventuring. In a tight space, players can reasonably encounter every type of roleplaying challenge and meet each with a dizzying array of strategies and tactics. Cities can also be a gamemaster’s (GM) nightmare. It’s difficult to know where players will go next, detailed preparation is almost impossible, and everything should be available. To be successful, GMs need overall planning and a good city map. This series will get you started on the map and support your planning.
This is the first of a short series of articles on mapping cities for fantasy roleplaying games. I’ll show you the main considerations as you place, design, detail, and then play in the city. When we’re done, you’ll be able to draw out a reasonable city with confidence and present your players with an experience they won’t forget. I use ProFantasy’s Campaign Cartographer as my main mapping tool, and all of the maps are drawn with it. There is no post-processing on any of the maps.
I recommend that as you build your own city, that you keep a notepad at your elbow to record your thoughts and designs. Mapping is a creative process, and you will find that you generate many ideas for future adventures as you create your maps. Write the ideas down, and transfer as many of them to the map itself as you can. That way you can find them when you need them. So if you’ve just mapped a narrow pass that would be perfect for an ambush, add that encounter idea as a “GM-only” hidden note. If you don’t write them down in the moment, it’s often tough to remember or recreate the ideas later. And it’s great to be preparing for a gaming session and pull up the notes as a way through creative blocks. You will find that in city building, these notes are critical to make the city come alive later.
About Cities
Cities in the middle ages were rare. Fewer than a dozen true metropolises existed before the modern era. That is because a city needs the following things to grow and flourish:
- Abundant food and water to feed the population
- Water access: Either a navigable river or seaport
- Defense: Hills, river bends, and offshore islands all protect the riches of the city.
- Trade routes: Trade is the lifeblood of the city and where routes meet or goods transfer, cities grow.
The first task for anyone mapping a city is to find a suitable site for the city. On the map below, I’ve mapped the most likely places for a city to grow:
 Continue reading »
12 Comments
 Little details add a great deal to a map. Look at these two images. The first is with trees and pathways in the courtyards. The second is without them. How much difference do these details make in your opinion? In my opinion, they make a big difference.
 Think about your city’s history and include details that suggest a city that has evolved. Your city should have a nucleus (the original settlement) from which it expanded. Consider how this expansion took place and the different phases through which it occurred. Think about how your city has grown. If there were old walls, roads that ran beside them most likely now mark where they once were. Maybe sections of these walls still stand or roads pass beneath old gates that are located far from what is now the city’s perimeter. What other changes may have occurred as your city grew?