Attributes are pieces of textual information that are attached to symbols. You can extract the information, save it in a text file then use it in spreadsheets and other applications. You can for example, type a text label for each population center at the time of symbol insertion.
The attribute must be included in the symbol definition, as it is a part of the symbol. Once defined, the user can interact with the symbol each time it is inserted by either defining the visible or hidden tag value.
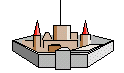
Draw a city symbol(or explode an exiting one), but do not yet define it as a symbol. First you’ll want to define the attributes.
The attribute you create will take on current text properties, so set them appropriately.
Define the attributes by invoking the DEFINE ATTRIBUTE command from the Symbols menu. Set the text size to be correct first. You will see the following dialog box:

Let’s assume you want a city symbol to hold the city’s name and population. You could draw your own city, but here’s an example using an existing city symbol which has been EXPLOD’ed. Don’t define the symbol until you’ve added any attributes.
Define the Name Attribute
An attribute consists of two parts: A tag and its value. The tag is akin to a variable name. It holds values that can be entered by the user when the symbol is inserted and/or it can hold a default value. In this example, the same symbol will be used to denote various city names, so an appropriate tag is "City". There should be no default (for an unnamed city).
The prompt text is what the user will be asked to answer when the symbol is inserted. Since the tag "City" will hold the value of the component, an appropriate prompt would be "City Name::"
The default value is what will appear in the value edit box when the user is prompted. The user can either accept the default value or type over it. The default value also enables you to pattern the input so the user types values in a consistent format.
Tag text: City
Prompt text: City Name
Default value:
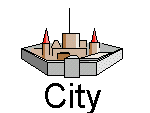 Insert the tag where you wish it to appear. When the symbol is inserted, the tag "City" will be replaced by the value entered by the user, or the default value. Tip: Try center justifying the text to keep the tag longitudinally centered on a symbol such as this.
Keep the tick boxes unchecked.
Define the Population attribute
For population, repeat the DEFINE ATTRIBUTES command and type the following values in:
Tag text: Population
Prompt text: Population
Default value:5000
The main difference for the "Population:" tag.is that we are assuming that you don’t want the population of every city displayed on the map. The hidden check box must be ticked. Place it on the map (it won’t be visible).
Define the Symbol
Define the symbol by using the DEFINE SYMBOL command. Be sure to include the attribute when selecting entities (select the Population attribute by PRIOR).
Insert the Symbol
Depress Symbols in Drawing ![]() . Scroll to the bottom to see your symbol. A dialog box will prompt you for a value:
. Scroll to the bottom to see your symbol. A dialog box will prompt you for a value:
Enter the city name and population. If you make a mistake when naming the city, simply select EDIT ![]() then the city name and type in a new value.
then the city name and type in a new value.
After a few insertions, on the Symbols menu click EXTRACT ATTRIBUTES to see the results.
Special Attributes
Some attributes are used by the New Drawing Wizard to add copyright notices and labels. See New Drawing Wizard Templates
Related topics
Define Attribute